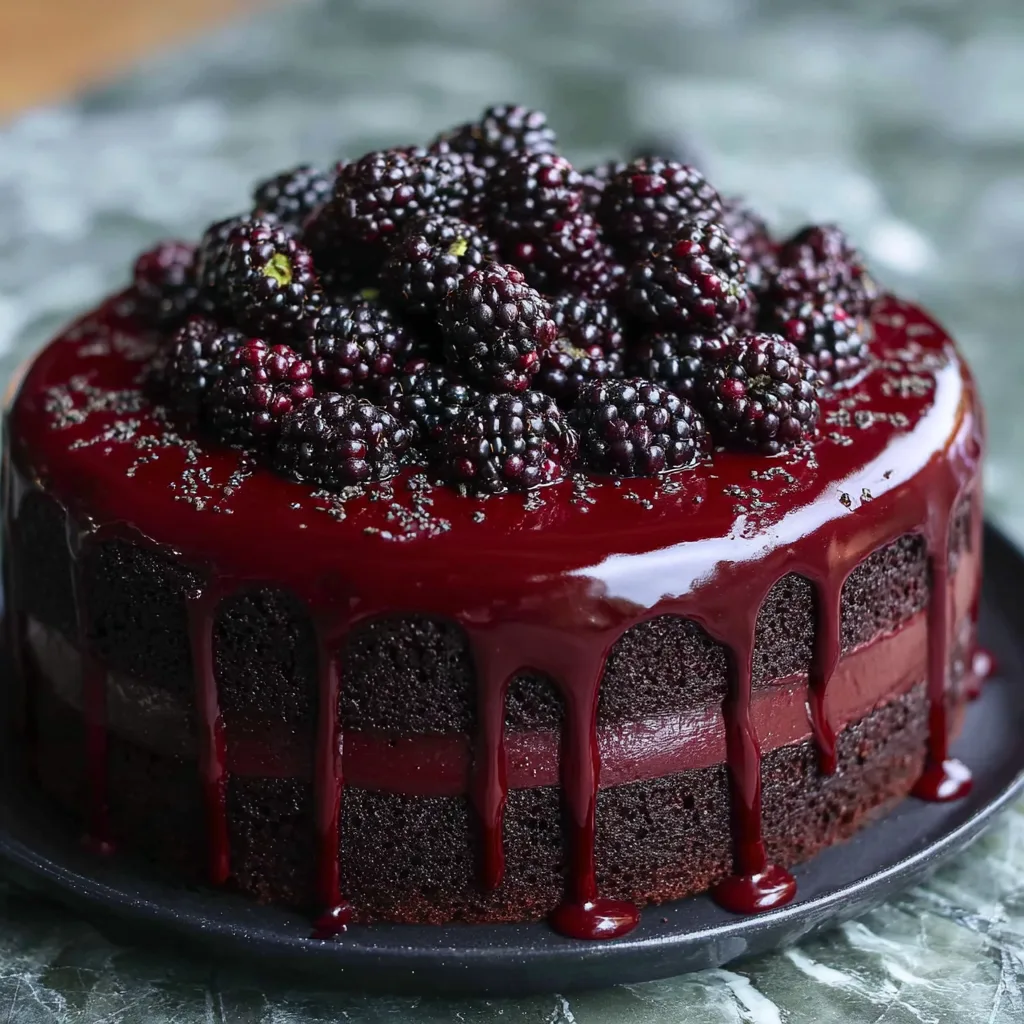
Blackberry Velvet Gothic Cake: A Dramatic Dessert Masterpiece
There’s something undeniably captivating about a cake that combines the richness of chocolate velvet with the deep, jewel-toned allure of fresh blackberries. The Blackberry Velvet Gothic Cake is not just a dessert—it’s a statement piece that brings drama, elegance, and irresistible flavor to any table. With its dark, moist chocolate layers, luscious blackberry filling, and glossy burgundy glaze cascading down the sides, this cake embodies the perfect balance between sophistication and indulgence. Whether you’re planning a special celebration, hosting a themed dinner party, or simply want to impress your loved ones with a show-stopping dessert, this gothic-inspired creation delivers on every level. The contrast between the deep chocolate cake and the vibrant blackberry elements creates a visual masterpiece that tastes just as extraordinary as it looks. In this comprehensive guide, we’ll walk you through every step of creating this stunning cake, from selecting the finest ingredients to mastering the techniques that bring this gothic beauty to life.
Why This Blackberry Velvet Gothic Cake Stands Out
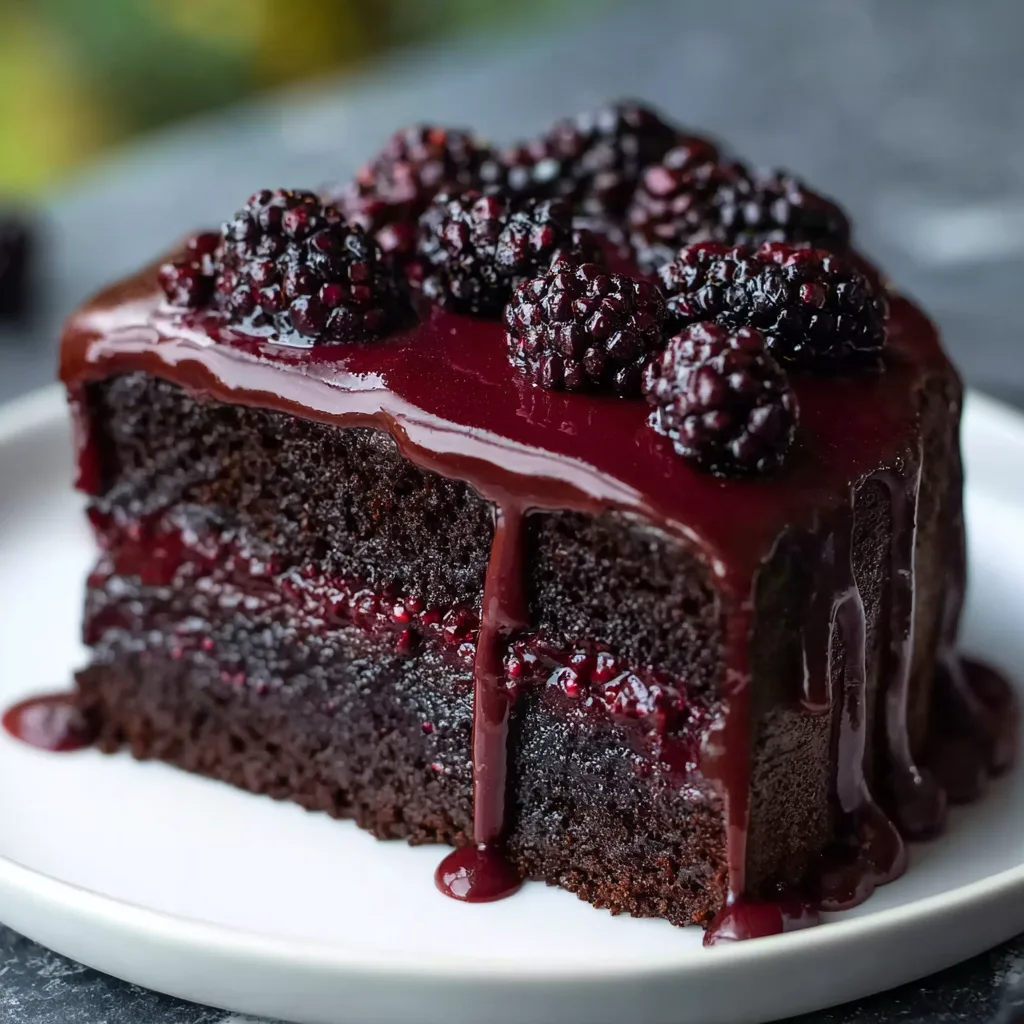
What makes this particular cake recipe truly special is the combination of textures and flavors that work together in perfect harmony. The chocolate cake base features a uniquely velvet-like crumb that’s incredibly moist and tender, achieved through careful ingredient ratios and proper mixing techniques. Unlike standard chocolate cakes that can sometimes turn out dry or dense, this recipe produces layers that are light yet substantial, with a fine, even crumb structure that melts on your tongue. The blackberry component adds not just visual drama but also a sophisticated tartness that cuts through the richness of the chocolate, preventing the dessert from becoming overwhelmingly sweet. Fresh blackberries bring brightness and complexity to each bite, while the blackberry glaze provides that Instagram-worthy drip effect that has become synonymous with modern cake design. The glossy, thick consistency of the glaze creates those perfect, slow-moving drips that give the cake its gothic, dramatic appearance. This isn’t just another chocolate cake recipe—it’s a multi-dimensional dessert experience that engages all the senses. The deep burgundy and dark brown color palette evokes a moody, sophisticated aesthetic that’s perfect for autumn gatherings, Halloween celebrations, or any occasion where you want to make a bold impression.
The Science Behind Perfect Velvet Texture
Creating that signature velvet texture in a cake requires understanding the science behind ingredient interactions. The term “velvet” in baking refers to an exceptionally fine, tender crumb structure with minimal air pockets and a moist, almost silky mouthfeel. This texture is achieved through several key techniques. First, the use of oil alongside or instead of butter helps maintain moisture retention, as oil remains liquid at room temperature while butter solidifies. However, this recipe uses a combination approach to balance moisture with flavor. The acidic components in the recipe, including buttermilk or sour cream, react with the leavening agents to create a tender crumb while adding subtle tangy notes that enhance the chocolate flavor. The cocoa powder must be high-quality and properly sifted to ensure even distribution throughout the batter without creating lumps. Mixing technique plays an equally crucial role—overmixing develops gluten strands that create a tough, chewy texture, while undermixing leaves pockets of dry flour. The goal is to mix just until ingredients are combined, with a smooth, homogeneous batter. Temperature also matters significantly; ingredients at room temperature blend more easily and create a more stable emulsion, resulting in that coveted velvet texture. When you bite into a properly made velvet cake, you should experience a tender crumb that compresses slightly under your teeth but maintains structural integrity, with moisture that lingers without feeling greasy or heavy.
Selecting and Preparing Fresh Blackberries
The success of this gothic cake heavily depends on the quality of your blackberries, as they serve both a functional and decorative purpose. When shopping for blackberries, look for berries that are deeply colored—almost black with a slight purple undertone—as these have reached peak ripeness and offer the most concentrated flavor. Avoid berries with red or green patches, which indicate underripeness and will taste sour rather than sweet-tart. The berries should feel plump and firm to the touch, with a slight give when gently pressed. Avoid any containers showing signs of moisture buildup, mold, or crushed berries at the bottom, as these indicate the fruit is past its prime. Fresh blackberries are highly perishable, so plan to use them within one to two days of purchase for optimal flavor and texture. Before using, rinse the berries gently under cool running water and spread them on paper towels to dry completely—excess moisture can cause the glaze to thin out or the cake to become soggy. For the filling and glaze, you’ll cook down a portion of the blackberries with sugar to create a concentrated sauce. This cooking process intensifies the berry flavor and creates that thick, syrupy consistency essential for the gothic drip effect. Reserve the most visually appealing berries for decorating the top of the cake, selecting ones that are similar in size and color for a cohesive presentation. Some recipes call for frozen blackberries, which can work in the cooked components, but fresh berries are essential for the final decoration to achieve that dramatic, jewel-like appearance.
Mastering the Blackberry Glaze Technique
The cascading blackberry glaze is arguably the most visually striking element of this gothic cake, and achieving those perfect, dramatic drips requires attention to detail and proper technique. The glaze must have the correct consistency—too thin and it will run completely off the cake creating a messy puddle on your serving plate; too thick and it won’t create those elegant drips that give the cake its signature look. The ideal glaze consistency is similar to warm honey or maple syrup, flowing slowly when poured but maintaining enough body to create controlled drips. To test consistency, dip a spoon into the glaze and hold it vertically—the glaze should slowly drip off in a thick, continuous stream rather than running off quickly or refusing to drip at all. Temperature plays a crucial role in glaze application. If the glaze is too hot, it will be too thin and slide right off the cake; if it’s too cool, it will be too thick and won’t create any drips. The sweet spot is warm but not hot—around 90-100°F is ideal. Before applying to your cake, do a test run on the side of your mixing bowl or a piece of parchment paper to ensure the consistency is perfect. When you’re ready to glaze, start by pouring a generous amount onto the center of the cake top, using an offset spatula to gently spread it toward the edges. As the glaze reaches the edge, it will naturally begin to drip down the sides. For more controlled drips, use a spoon to add extra glaze at specific points along the edge. The key is working quickly but deliberately, as the glaze will begin to set as it cools. If you want those picture-perfect, evenly spaced drips, pour small amounts of glaze at regular intervals around the cake’s perimeter rather than flooding the entire top surface at once.
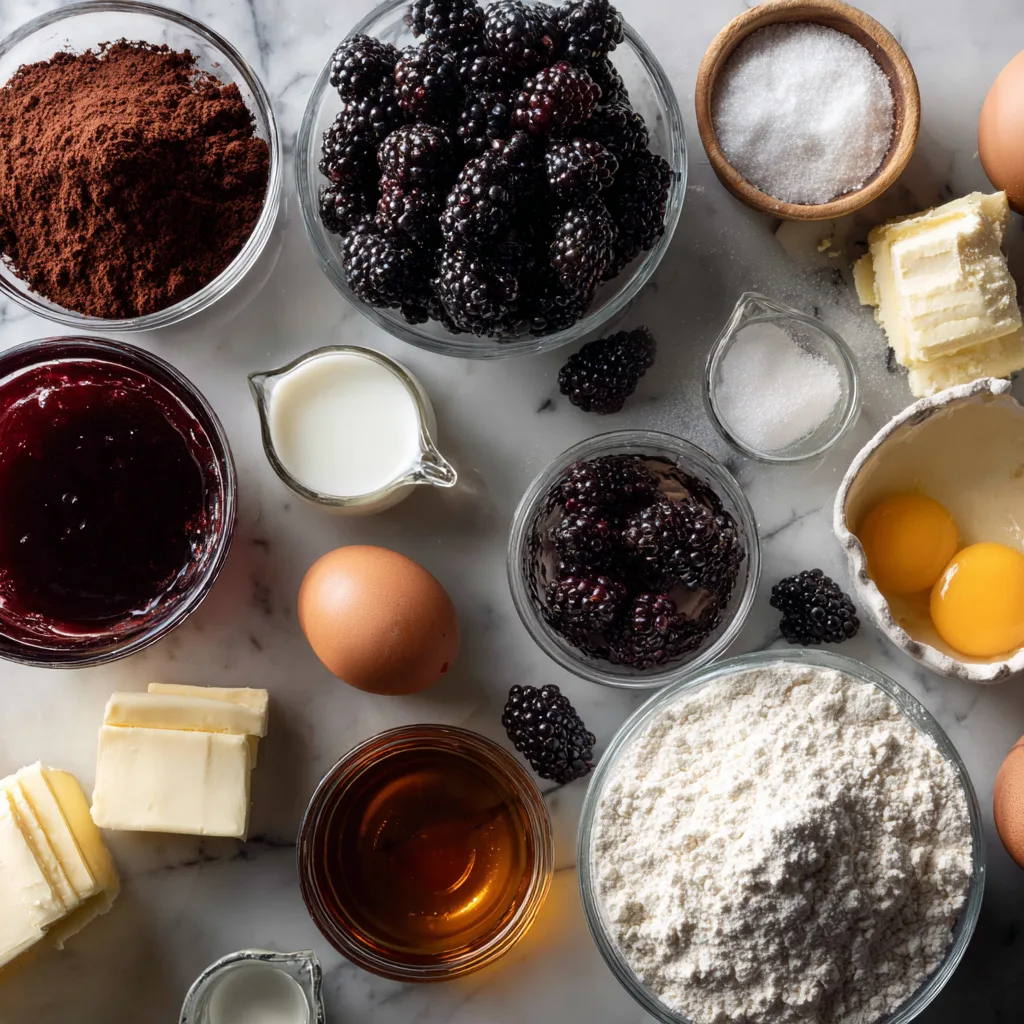
Ingredients
For the Chocolate Velvet Cake:
- 2 cups all-purpose flour
- 1¾ cups granulated sugar
- ¾ cup unsweetened cocoa powder
- 2 teaspoons baking soda
- 1 teaspoon baking powder
- 1 teaspoon salt
- 2 large eggs, room temperature
- 1 cup whole milk, room temperature
- ½ cup vegetable oil
- 2 teaspoons vanilla extract
- 1 cup hot brewed coffee
For the Blackberry Filling:
- 2 cups fresh blackberries
- ½ cup granulated sugar
- 2 tablespoons cornstarch
- 2 tablespoons water
- 1 tablespoon lemon juice
For the Blackberry Glaze:
- 1½ cups fresh blackberries
- ¾ cup granulated sugar
- ¼ cup water
- 2 tablespoons light corn syrup
- ½ cup heavy cream
For Decoration:
- 1 cup fresh whole blackberries
- Edible silver decorative flowers or silver leaf flakes
Instructions
- Preheat your oven to 350°F and prepare two 8-inch round cake pans by greasing them thoroughly and lining the bottoms with parchment paper circles for easy removal after baking.
- In a large mixing bowl, sift together the flour, sugar, cocoa powder, baking soda, baking powder, and salt, whisking to ensure all dry ingredients are evenly distributed without lumps.
- In a separate bowl, whisk together the eggs, milk, oil, and vanilla extract until the mixture is smooth and well combined with a uniform consistency.
- Pour the wet ingredients into the dry ingredients and mix on medium speed just until combined, then slowly add the hot coffee while mixing on low speed, creating a thin batter that’s perfectly normal for this recipe.
- Divide the batter evenly between the prepared pans and bake for 30-35 minutes, or until a toothpick inserted into the center comes out with just a few moist crumbs attached.
- Allow the cakes to cool in their pans for 10 minutes before turning them out onto wire racks to cool completely, ensuring they reach room temperature before assembly to prevent melting the filling.
- While the cakes cool, prepare the blackberry filling by combining blackberries and sugar in a medium saucepan over medium heat, stirring occasionally as the berries break down and release their juices.
- Mix the cornstarch with water to create a slurry, then stir this into the simmering berry mixture and cook for 2-3 minutes until the filling thickens considerably and coats the back of a spoon.
- Remove the filling from heat, stir in the lemon juice, then strain through a fine-mesh sieve to remove seeds if desired, pressing the berries to extract all the flavorful liquid, and allow to cool completely.
- For the glaze, combine blackberries, sugar, water, and corn syrup in a saucepan and bring to a boil, then reduce heat and simmer for 8-10 minutes until the mixture is reduced and syrupy.
- Strain the blackberry mixture through a fine-mesh sieve to remove all seeds and pulp, then return the strained liquid to the pan and stir in the heavy cream, simmering for another 2-3 minutes.
- Allow the glaze to cool to warm room temperature, stirring occasionally to prevent a skin from forming, until it reaches the perfect honey-like consistency for creating those dramatic drips.
- Place the first cake layer on your serving plate, spread the cooled blackberry filling evenly over the top leaving a small border around the edge, then carefully position the second layer on top and press gently to secure.
- Pour the warm blackberry glaze onto the center of the cake top and use an offset spatula to spread it toward the edges, allowing it to naturally drip down the sides for that gothic cascade effect.
- Immediately arrange fresh blackberries on top of the glazed surface while it’s still slightly wet so they adhere properly, then scatter edible silver decorative flowers around the berries for an elegant finishing touch.
- Allow the glaze to set for at least 30 minutes at room temperature before slicing, or refrigerate for 15 minutes if you need to serve sooner, ensuring clean slices that showcase the beautiful layers.
Blackberry Velvet Gothic Cake
Ingredients
Equipment
Method
- Preheat your oven to 350°F and prepare two 8-inch round cake pans by greasing them thoroughly and lining the bottoms with parchment paper circles.
- In a large mixing bowl, sift together the flour, sugar, cocoa powder, baking soda, baking powder, and salt, whisking to ensure even distribution.
- In a separate bowl, whisk together the eggs, milk, oil, and vanilla extract until smooth and well combined.
- Pour the wet ingredients into the dry ingredients and mix on medium speed just until combined, then slowly add the hot coffee while mixing on low speed.
- Divide the batter evenly between the prepared pans and bake for 30-35 minutes, or until a toothpick inserted into the center comes out with just a few moist crumbs.
- Allow the cakes to cool in their pans for 10 minutes before turning them out onto wire racks to cool completely.
- While the cakes cool, prepare the blackberry filling by combining blackberries and sugar in a medium saucepan over medium heat, stirring occasionally.
- Mix the cornstarch with water to create a slurry, then stir this into the simmering berry mixture and cook for 2-3 minutes until thickened.
- Remove the filling from heat, stir in the lemon juice, then strain through a fine-mesh sieve to remove seeds, and allow to cool completely.
- For the glaze, combine blackberries, sugar, water, and corn syrup in a saucepan and bring to a boil, then reduce heat and simmer for 8-10 minutes.
- Strain the blackberry mixture through a fine-mesh sieve, then return the strained liquid to the pan and stir in the heavy cream, simmering for another 2-3 minutes.
- Allow the glaze to cool to warm room temperature, stirring occasionally, until it reaches a honey-like consistency.
- Place the first cake layer on your serving plate, spread the cooled blackberry filling evenly over the top, then carefully position the second layer on top.
- Pour the warm blackberry glaze onto the center of the cake top and use an offset spatula to spread it toward the edges, allowing it to drip down the sides.
- Immediately arrange fresh blackberries on top of the glazed surface and scatter edible silver decorative flowers around the berries.
- Allow the glaze to set for at least 30 minutes at room temperature before slicing, or refrigerate for 15 minutes if serving sooner.
Notes
Building Structural Integrity for Layer Cakes
One challenge home bakers often face with dramatic layer cakes is structural instability, particularly when working with moist cake layers and heavy glazes. This Blackberry Velvet Gothic Cake requires proper construction techniques to ensure it doesn’t collapse or slide apart when served. First, ensure your cake layers are completely cool before assembly—even slightly warm cakes will melt buttercream or cause fillings to slide. Level each layer using a serrated knife or cake leveler, removing any domed tops to create flat, even surfaces that stack properly. Some bakers prefer to chill their cake layers for 30 minutes before assembly, as cold cake is firmer and easier to handle without breaking. When spreading the blackberry filling, create a small dam around the outer edge using a thin layer of frosting if you’re concerned about the filling seeping out—this technique, called a “frosting dam,” contains the softer filling and prevents it from squeezing out when you add the top layer. Press down gently but firmly on the top layer to ensure good contact with the filling below. If your cake seems unstable or you’re transporting it, insert a few wooden dowels or thick plastic straws vertically through all layers, trimming them flush with the top surface—these internal supports prevent layers from shifting. For the heavy glaze, ensure the cake is well-chilled before pouring so the glaze sets quickly rather than continuing to slide. If you notice the glaze pooling too much at the base, gently wipe away the excess with a paper towel before it sets completely.
Storage and Make-Ahead Strategies
Understanding proper storage techniques ensures your Blackberry Velvet Gothic Cake maintains its quality and dramatic appearance even when prepared in advance. The cake layers can be baked up to two days ahead and stored wrapped tightly in plastic wrap at room temperature, or frozen for up to one month if wrapped in both plastic wrap and aluminum foil—just thaw completely before assembling. The blackberry filling can be prepared up to three days in advance and stored in an airtight container in the refrigerator, bringing it back to room temperature or warming it slightly before spreading to ensure easy application. The glaze, however, is best made fresh on the day of assembly, as reheating can affect its consistency and shine. Once assembled and glazed, the finished cake should be stored in the refrigerator due to the fresh berry decorations and glaze, but bring it to room temperature about 30 minutes before serving to restore the velvet texture and full flavor of the chocolate layers. Cover the cake loosely with plastic wrap or place it in a cake dome to prevent the glaze from absorbing refrigerator odors. The cake tastes best within 2-3 days of assembly, though the cake layers themselves remain moist for up to five days when properly stored. If you need to transport the cake, keep it refrigerated until the last possible moment, and if traveling more than a short distance, place the cake box on a flat surface in your vehicle rather than on a seat where it might slide around.
Conclusion: Your Gothic Masterpiece Awaits
Creating a Blackberry Velvet Gothic Cake is more than just following a recipe—it’s about embracing the artistry of baking and allowing yourself to craft something truly spectacular. This dramatic dessert combines technical baking skills with creative presentation, resulting in a cake that’s as delicious as it is visually stunning. The deep chocolate layers provide a rich, comforting base while the bright blackberry elements add sophistication and complexity. The glossy burgundy glaze cascading down the dark sides creates that gothic drama that makes this cake unforgettable. Whether you’re an experienced baker looking for your next challenge or an ambitious home cook ready to impress, this recipe offers the perfect opportunity to expand your skills while creating something genuinely special. The combination of textures—from the tender velvet crumb to the smooth glaze to the fresh berry burst—makes every bite an experience. Don’t be intimidated by the multiple components; each step builds upon the last, and the final result is well worth the effort. When you present this cake at your next gathering, prepare for gasps of admiration and requests for the recipe. The Blackberry Velvet Gothic Cake isn’t just dessert—it’s an edible work of art that brings people together and creates lasting memories around your table.