Brownie Refrigerator Cake: The Ultimate No-Bake Chocolate Dessert
If you’re searching for a show-stopping dessert that requires zero baking skills and minimal effort, this Brownie Refrigerator Cake is your new best friend. Combining the rich, fudgy texture of brownies with layers of creamy vanilla filling, chocolate pudding, and billowy whipped cream, this dessert delivers maximum indulgence with minimum stress. Whether you’re preparing for a family gathering, holiday celebration, or simply satisfying an intense chocolate craving, this refrigerator cake checks every box. The beauty of this recipe lies not just in its incredible taste, but in its convenience—you can prepare it entirely in advance, letting your refrigerator do all the heavy lifting while you focus on other tasks.
The concept of refrigerator cakes has been around for decades, originating as a creative solution for busy home cooks who wanted impressive desserts without spending hours in the kitchen. This particular version elevates the classic concept by incorporating store-bought brownie layers, which provide a rich chocolate foundation that pairs perfectly with the lighter, creamier layers stacked above. The result is a stunning dessert with distinct layers that look professionally crafted, even though anyone can master this recipe with basic kitchen skills. Each forkful delivers multiple textures and flavors—the dense chewiness of brownies, the smooth richness of chocolate pudding, the light fluffiness of whipped cream, and the satisfying crunch of nuts and chocolate shavings.
What makes this Brownie Refrigerator Cake particularly special is its adaptability. You can customize it endlessly based on your preferences or what’s available in your pantry. Want to make it more decadent? Add extra chocolate layers. Prefer a lighter version? Reduce the pudding layer and increase the whipped cream. You can even play with flavors by incorporating mint extract, peanut butter, caramel sauce, or different types of nuts. The basic structure remains foolproof while offering endless possibilities for personalization. This flexibility makes it an ideal recipe for both novice bakers and experienced dessert enthusiasts looking for a reliable crowd-pleaser.
Why This Recipe Works Every Single Time
The genius of this Brownie Refrigerator Cake lies in its methodical layering system. Unlike traditional baked cakes that can sink, burn, or turn out dry, refrigerator cakes rely on chilling to set their structure. This means there’s virtually no way to mess it up—as long as you give it adequate refrigeration time, your dessert will turn out beautifully. The brownies provide a sturdy base that won’t become soggy, while the cream cheese filling adds richness and stability to the middle layers. The chocolate pudding layer contributes moisture and intense chocolate flavor without making the dessert too heavy, and the whipped cream topping adds visual appeal and a light textural contrast.
Another reason this recipe succeeds so consistently is the balance of flavors. The brownies bring deep, almost fudgy chocolate notes that anchor the entire dessert. The vanilla cream cheese layer offers a subtle sweetness that prevents the dessert from becoming one-dimensional chocolate overload. The chocolate pudding reinforces the primary chocolate theme while adding a smooth, velvety texture that melts on your tongue. Finally, the whipped cream and chocolate drizzle on top provide both visual drama and a finishing flourish that makes each bite feel complete. This careful balance ensures that even chocolate enthusiasts won’t find the dessert overwhelming, while those who prefer lighter desserts will appreciate the cream layers that break up the richness.
The make-ahead nature of this dessert cannot be overstated as an advantage. In our busy modern lives, being able to prepare a stunning dessert the day before an event is invaluable. The Brownie Refrigerator Cake actually benefits from extended chilling time, allowing the layers to meld together and the flavors to develop fully. This means you can prepare it up to two days in advance, freeing up your schedule on the actual day of your gathering. When your guests arrive, you simply slice and serve—no last-minute baking, no timing stress, no worrying about whether it turned out correctly. This convenience factor alone makes it a go-to recipe for holidays, potlucks, birthday parties, and any occasion where you want to impress without the pressure.
The Secret to Perfect Layers Every Time
Creating distinct, beautiful layers is easier than you might think, but a few key techniques ensure success. First, always let each layer set slightly before adding the next one. While you don’t need to wait for complete solidification, giving each layer about fifteen to twenty minutes in the refrigerator helps prevent them from bleeding into each other. This brief chilling period creates subtle boundaries that make your final product look professionally crafted. Second, spread each layer gently but thoroughly, working from the center outward to ensure even distribution. Using an offset spatula makes this process much easier and helps achieve smooth, level surfaces.
Temperature control plays a crucial role in the success of your Brownie Refrigerator Cake. Make sure your cream cheese is properly softened before mixing—this ensures a smooth, lump-free filling that spreads easily. However, don’t let it get too warm, as this can make the layer too loose and unstable. Similarly, prepare your pudding according to package directions and let it thicken appropriately before spreading it over the cream layer. If it’s too thin, it will seep into the layer below; if it’s too thick, it will be difficult to spread evenly. These small attention-to-detail moments make the difference between a good refrigerator cake and a great one.
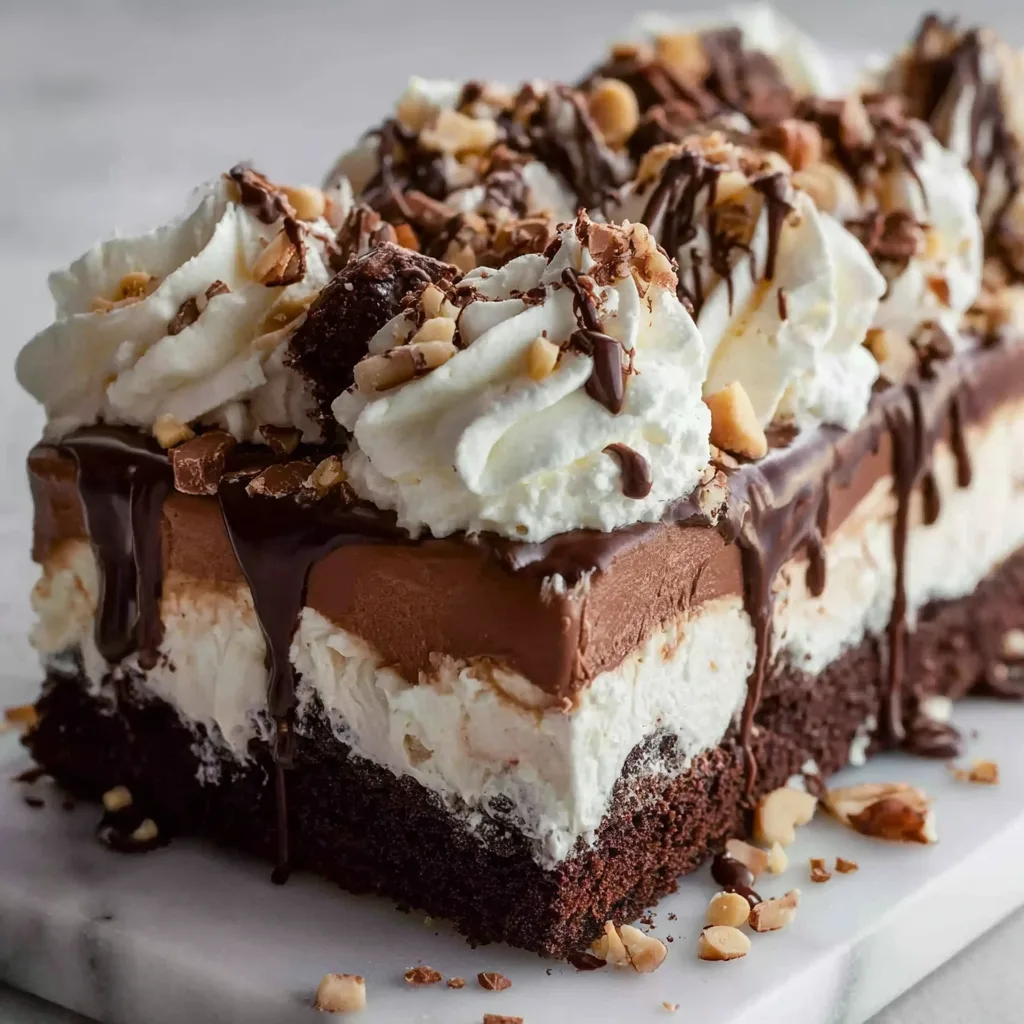
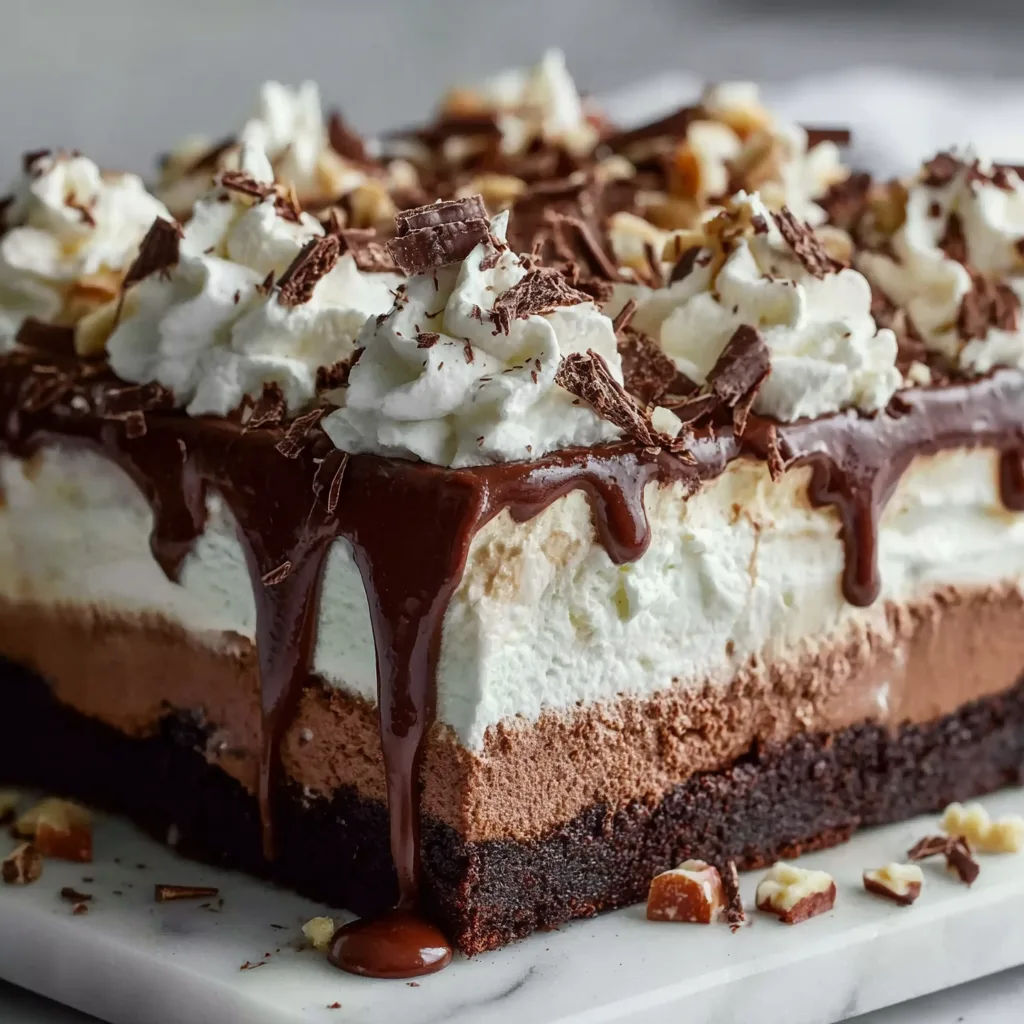
The final assembly is where your Brownie Refrigerator Cake transforms from simple ingredients into an impressive dessert. The whipped cream topping should be applied generously, creating swoops and peaks that catch the light and add visual dimension. Don’t worry about making it perfect—rustic, homemade charm is part of this dessert’s appeal. The chocolate drizzle should be applied while slightly warm so it flows naturally down the sides, creating those gorgeous rivulets that make the cake look bakery-worthy. Finally, the chocolate shavings and chopped nuts add textural contrast and professional finishing touches that elevate the entire presentation.
Ingredients
- 1 box brownie mix (plus required eggs, oil, and water)
- 8 oz cream cheese, softened
- 1/2 cup powdered sugar
- 1 tsp vanilla extract
- 8 oz whipped topping, divided
- 2 boxes instant chocolate pudding mix
- 3 cups cold milk
- 1 cup chocolate sauce
- 1/2 cup chocolate shavings
- 1/2 cup chopped nuts (walnuts or pecans)

Instructions
- Prepare brownies according to package directions in a 9×13 inch baking dish. Let cool completely, then cut into squares if needed or leave whole as base layer.
- Beat softened cream cheese with powdered sugar and vanilla extract until smooth and creamy, about two to three minutes using electric mixer.
- Fold in half of the whipped topping into cream cheese mixture until well combined and fluffy texture achieved.
- Spread cream cheese mixture evenly over brownie layer, working from center outward to ensure smooth distribution across entire surface.
- Prepare chocolate pudding by whisking both boxes with cold milk for two minutes until thickened. Let stand five minutes to set properly.
- Spread thickened chocolate pudding carefully over cream cheese layer, creating smooth even surface without disturbing layer below.
- Spread remaining whipped topping over pudding layer, creating decorative peaks and swoops for visual appeal.
- Drizzle chocolate sauce generously over whipped cream topping, allowing it to cascade down sides naturally.
- Sprinkle chocolate shavings and chopped nuts evenly across top surface for finishing touch and added texture.
- Refrigerate cake for at least four hours or overnight to allow layers to set completely and flavors to meld together before serving.
Brownie Refrigerator Cake
Ingredients
Equipment
Method
- Prepare brownies according to package directions in a 9×13 inch baking dish. Let cool completely.
- Beat softened cream cheese with powdered sugar and vanilla extract until smooth and creamy, about 2-3 minutes.
- Fold in half of the whipped topping into cream cheese mixture until well combined and fluffy.
- Spread cream cheese mixture evenly over cooled brownie layer.
- Whisk both boxes of chocolate pudding mix with cold milk for 2 minutes until thickened. Let stand 5 minutes.
- Spread thickened chocolate pudding carefully over cream cheese layer.
- Spread remaining whipped topping over pudding layer, creating decorative peaks.
- Drizzle chocolate sauce generously over whipped cream topping.
- Sprinkle chocolate shavings and chopped nuts evenly across top.
- Refrigerate for at least 4 hours or overnight before serving. Cut into squares to serve.
Notes
Mastering the Art of Presentation
While this Brownie Refrigerator Cake tastes incredible regardless of how it looks, presentation elevates it from homemade dessert to show-stopping centerpiece. Start by choosing the right serving dish—a clear glass baking dish showcases the beautiful layers, while a decorative platter adds elegance. When it’s time to serve, use a sharp knife dipped in hot water and wiped clean between cuts. This technique ensures clean slices that display all the layers clearly. Place each slice carefully on individual plates, and consider adding a small dollop of extra whipped cream or a drizzle of chocolate sauce on the plate for restaurant-style presentation.
Garnishing individual servings takes the presentation up another notch. A fresh mint leaf adds a pop of color and a hint of freshness that cuts through the richness. A dusting of cocoa powder around the plate edge creates an elegant frame for your slice. You could even add fresh berries—strawberries or raspberries provide beautiful color contrast and their slight tartness balances the sweet chocolate. These small touches show your guests that you’ve put thought and care into every aspect of the dessert experience, even though the actual preparation was remarkably simple.
Photography tips can help you capture this beautiful dessert for sharing on social media or keeping in your recipe collection. Natural light works best for food photography, so position your cake near a window if possible. Capture both the whole cake to show its impressive size and layers, and close-up shots of individual slices to highlight the texture and detail. The contrast between the dark brownie base, white cream layer, dark pudding, and white whipped cream creates natural visual interest that photographs beautifully. Don’t forget to capture that crucial moment when you first slice into the cake and reveal those perfect layers—this shot always generates the most engagement and appreciation.
Creative Variations to Try Next Time
Once you’ve mastered the basic Brownie Refrigerator Cake, countless variations await your experimentation. Consider a peanut butter version by adding peanut butter to the cream cheese layer and sprinkling Reese’s pieces on top. A mint chocolate variation works beautifully with a few drops of peppermint extract in the cream layer and crushed Andes mints as garnish. For coffee lovers, add instant espresso powder to the pudding mixture and top with chocolate-covered espresso beans. Seasonal versions could incorporate pumpkin spice in fall, peppermint in winter, or fresh fruit in summer.
Dietary modifications are also surprisingly simple with this flexible recipe. For a lighter version, use sugar-free pudding, reduced-fat cream cheese, and light whipped topping—the result is still delicious while cutting significant calories and fat. Gluten-free versions work perfectly by using gluten-free brownie mix as your base. You could even make individual portions in small glasses or mason jars, creating perfectly portioned parfait-style desserts that are ideal for parties or portion control. These variations prove that once you understand the basic structure, you can adapt this recipe endlessly to suit any preference, occasion, or dietary need.
Conclusion: Your New Go-To Dessert Solution
The Brownie Refrigerator Cake represents everything we love about smart, modern baking—it’s impressive yet effortless, indulgent yet manageable, and flexible enough to adapt to any occasion or preference. This recipe proves that you don’t need advanced baking skills or hours of preparation to create a dessert that wows your family and friends. With basic ingredients, simple layering techniques, and the magic of refrigeration time, you can produce a show-stopping dessert that looks and tastes like it came from a professional bakery. Whether you’re an experienced baker looking for a convenient make-ahead option or a beginner searching for a foolproof impressive dessert, this Brownie Refrigerator Cake delivers on every level. Make it once, and it will undoubtedly become a permanent fixture in your dessert repertoire, requested again and again by everyone who tries it.