Christmas Thumbprint Cookies: The Ultimate Holiday Baking Guide
There’s something magical about Christmas thumbprint cookies that makes them a staple at every holiday gathering. These delightful butter cookies with their signature jam-filled centers have been gracing cookie platters for generations, bringing joy and sweetness to celebrations around the world. Whether you’re planning a cookie exchange, preparing treats for Santa, or simply want to fill your home with the warm aroma of freshly baked cookies, this classic recipe delivers every single time.
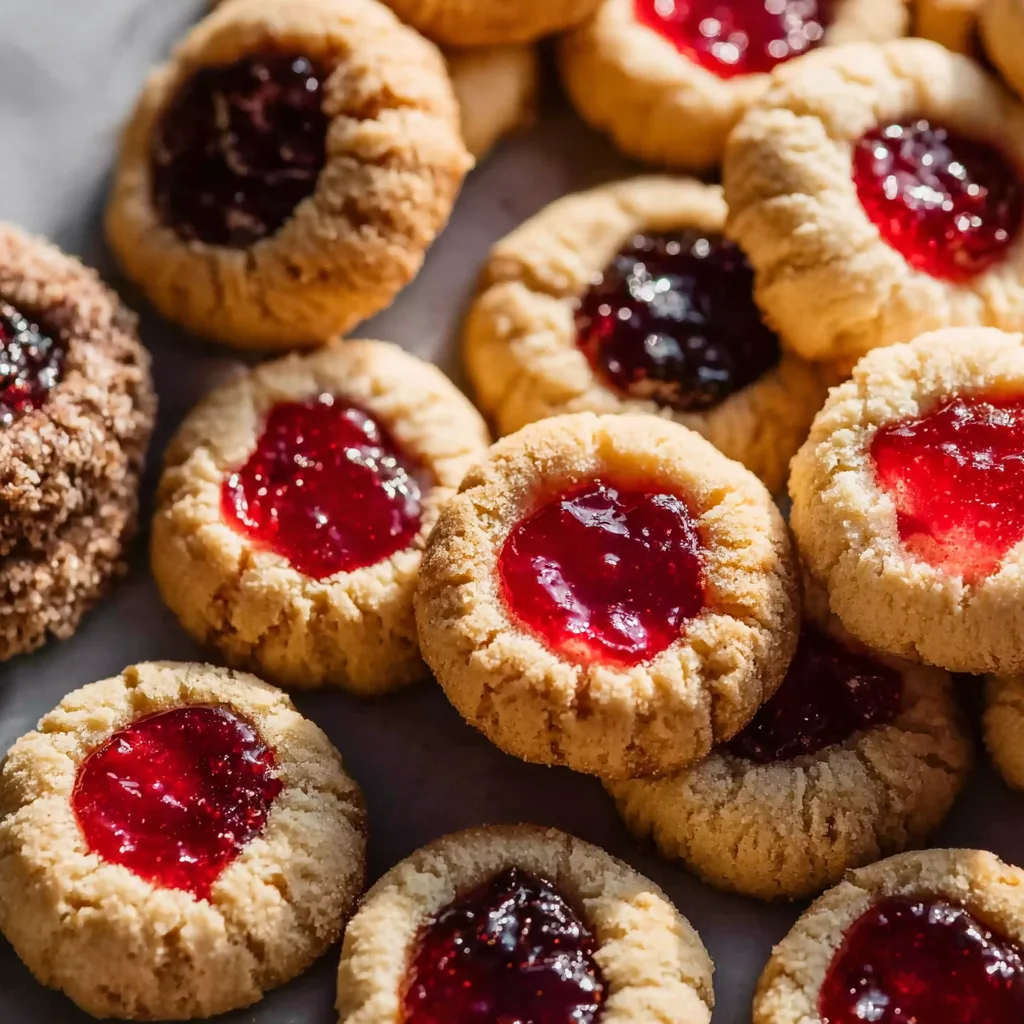
Christmas thumbprint cookies are more than just a dessert—they’re a tradition that brings families together in the kitchen. The simple act of pressing your thumb into each cookie dough ball creates that iconic indentation, making these treats as fun to make as they are to eat. Children and adults alike love participating in the baking process, and the beautiful presentation of these cookies makes them perfect for gift-giving or displaying on your holiday dessert table.
What makes thumbprint cookies truly special is their versatility and timeless appeal. The buttery, melt-in-your-mouth cookie base pairs beautifully with various jam flavors, allowing you to customize each batch according to your preferences. From classic raspberry and strawberry to more adventurous flavors like apricot or blackberry, the possibilities are endless. This recipe has been perfected over the years to ensure you achieve that ideal texture—crispy on the outside, tender on the inside, with a jewel-like center of glossy jam that catches everyone’s eye.
The History Behind These Beloved Holiday Treats
Thumbprint cookies have a rich history that spans multiple cultures and generations. While the exact origin remains debated among culinary historians, most agree that these delightful treats gained popularity in Scandinavian countries before making their way across Europe and eventually to North America. The traditional Swedish version, known as “hallongrotta” or raspberry cave, features a similar concept with buttery dough and fruit preserve filling.

During the mid-twentieth century, thumbprint cookies became a staple of American holiday baking, particularly during Christmas season. Home bakers appreciated the simplicity of the recipe and the impressive visual appeal of the finished cookies. The technique of creating an indentation with one’s thumb became a cherished activity for families, allowing even young children to help in the kitchen while developing their baking skills and creating lasting memories.
What truly cemented thumbprint cookies as a Christmas tradition was their appearance at cookie exchanges and holiday parties throughout the decades. The vibrant colors of various jam fillings made these cookies stand out on dessert platters, while their rich butter flavor satisfied even the most discerning sweet tooth. Today, thumbprint cookies continue to evolve with modern variations including chocolate-filled centers, dulce de leche, lemon curd, and even savory versions, though the classic jam-filled variety remains the most beloved.
Why This Recipe Works Better Than Others
The secret to perfect Christmas thumbprint cookies lies in understanding the science behind each ingredient and technique. This recipe has been carefully calibrated to create the ideal cookie texture—one that holds its shape during baking, develops a slightly crispy exterior, and maintains a tender, almost shortbread-like interior. The key is in the ratio of butter to flour and the proper creaming technique that incorporates just enough air without making the cookies too cake-like.
Unlike many other thumbprint cookie recipes that result in cookies spreading too much or losing their indentation during baking, this version uses specific techniques to prevent common baking disasters. The dough is chilled adequately to prevent excessive spreading, and the thumb indentation is made at precisely the right moment—not too early when the dough is still soft, and not too late when it becomes difficult to shape. Additionally, the cookies are baked at the optimal temperature that allows them to set properly without over-browning.
Another critical factor is the quality and preparation of the jam filling. Using high-quality preserves with good fruit content ensures a flavorful center that complements rather than overwhelms the buttery cookie. The jam should be thick enough to stay in place during baking without running all over the cookie sheet, yet glossy and smooth enough to create that signature jewel-like appearance. Some recipes call for adding the jam before baking, while others suggest filling after—this recipe uses a tested method that produces consistently beautiful results every time.
Ingredients
Cookie Dough:
- 2 cups all-purpose flour
- 1/2 teaspoon salt
- 1 cup unsalted butter, softened to room temperature
- 2/3 cup granulated sugar
- 2 large egg yolks
- 1 teaspoon vanilla extract
- 1/4 teaspoon almond extract (optional but recommended)

For Rolling:
- 1 cup finely chopped nuts (pecans, walnuts, or almonds) or granulated sugar
Filling:
- 1/2 cup raspberry jam, strawberry jam, or jam of your choice
- Additional jam for touch-ups after baking if needed
Instructions
- Preheat your oven to 350°F (175°C) and line two baking sheets with parchment paper or silicone baking mats to prevent sticking and ensure even baking.
- In a medium mixing bowl, whisk together the all-purpose flour and salt until well combined, then set this dry mixture aside for later use.
- Using a stand mixer or hand mixer, cream the softened butter and granulated sugar together on medium-high speed for approximately three to four minutes until the mixture becomes light, fluffy, and pale in color—this step is crucial for achieving the right cookie texture.
- Add the egg yolks one at a time to the butter mixture, beating well after each addition, then mix in the vanilla extract and almond extract if using, ensuring everything is thoroughly incorporated.
- Gradually add the flour mixture to the wet ingredients on low speed, mixing just until the dough comes together and no flour streaks remain—be careful not to overmix as this can result in tough cookies.
- If the dough feels too soft or sticky to handle, cover the bowl with plastic wrap and refrigerate for fifteen to twenty minutes until it firms up enough to roll into balls easily.
- Place your chopped nuts or granulated sugar in a shallow bowl for rolling the cookie dough balls.
- Scoop about one tablespoon of dough and roll it between your palms to form a smooth ball, then roll the ball in the nuts or sugar until evenly coated on all sides.
- Place the coated dough balls on the prepared baking sheets, spacing them about two inches apart to allow for slight spreading during baking.
- Using your thumb or the back of a rounded half-teaspoon measure, press firmly into the center of each cookie to create a deep indentation—the indentation should be substantial as it will puff up slightly during baking.
- Carefully spoon about half a teaspoon of jam into each indentation, filling it generously but not allowing the jam to overflow onto the cookie surface.
- Bake the cookies for twelve to fifteen minutes, or until the edges are lightly golden and the cookies are set—avoid overbaking as this will result in hard, dry cookies rather than tender ones.
- Remove the baking sheets from the oven and allow the cookies to cool on the pan for five minutes before transferring them to a wire rack to cool completely.
- If any of the indentations have puffed up during baking, gently press them down again with the back of a spoon while the cookies are still warm, then add a small amount of additional jam if needed.
- Once completely cooled, store the thumbprint cookies in an airtight container at room temperature where they will stay fresh for up to one week, or freeze for longer storage.
Christmas Thumbprint Cookies
Ingredients
Equipment
Method
- Preheat oven to 350°F (175°C). Line two baking sheets with parchment paper.
- In a medium bowl, whisk together flour and salt. Set aside.
- Cream butter and sugar until light and fluffy, about 3-4 minutes. Add egg yolks, vanilla, and almond extract, mixing well.
- Gradually add flour mixture on low speed until dough comes together. Refrigerate 15-20 minutes if too soft.
- Place chopped nuts or sugar in a shallow bowl. Roll dough into 1-tablespoon balls, then roll in nuts or sugar.
- Place balls 2 inches apart on baking sheets. Press thumb firmly into center of each cookie to create deep indentation.
- Fill each indentation with about 1/2 teaspoon jam.
- Bake 12-15 minutes until edges are lightly golden. Cool on pan 5 minutes, then transfer to wire rack.
- If indentations puff during baking, press down gently while warm and add more jam if needed.
Notes
Pro Tips for Bakery-Quality Results Every Time
Achieving professional-looking Christmas thumbprint cookies requires attention to detail and a few insider techniques that can elevate your baking from good to extraordinary. First and foremost, ensure all your ingredients are at proper room temperature, particularly the butter. Butter that’s too cold won’t cream properly, while butter that’s too soft or melted will result in cookies that spread too much. The ideal temperature is around sixty-five to sixty-eight degrees Fahrenheit—the butter should be soft enough to leave an indentation when pressed but still hold its shape.
When forming the cookie dough balls, consistency in size is crucial for even baking. Using a cookie scoop ensures all your cookies are uniform, which means they’ll all bake at the same rate and you won’t end up with some burnt cookies and others undercooked. If you don’t have a cookie scoop, use a tablespoon measure and pack the dough firmly to create equal portions. Taking an extra minute to ensure uniformity will result in a much more professional-looking final product.
The rolling step is where many bakers struggle, but there’s a simple trick to make it easier. If you’re using chopped nuts, pulse them in a food processor until they’re finely ground but not turned into butter—you want small pieces that will adhere to the cookie dough without large chunks that might fall off during baking. For a nut-free version, rolling in coarse sugar or even colored sugars can create a beautiful festive appearance. Press each dough ball firmly into the nuts or sugar, turning to coat all sides, which helps create that delightful textured exterior.
Creative Variations to Try This Holiday Season
While classic raspberry or strawberry jam thumbprint cookies will never go out of style, experimenting with different flavors and fillings can add exciting variety to your holiday cookie platter. Consider using apricot preserves for a tangy-sweet combination that pairs beautifully with the buttery cookie base, or try blackberry jam for a deeper, more complex fruit flavor. Seedless varieties work best as they provide a smoother texture and more elegant appearance.
For chocolate lovers, fill the thumbprint indentations with melted chocolate ganache, chocolate hazelnut spread, or even caramel sauce instead of jam. These variations create an entirely different flavor profile while maintaining the classic thumbprint cookie appearance. You can also experiment with lemon curd for a bright, citrusy option that’s particularly refreshing after a heavy holiday meal, or dulce de leche for an indulgent caramel twist.
Don’t be afraid to get creative with the cookie dough itself by adding complementary spices like cinnamon, nutmeg, or cardamom for warmth and depth. Orange or lemon zest can brighten the flavor profile, while substituting part of the all-purpose flour with almond flour creates a more delicate, melt-in-your-mouth texture. For a truly festive presentation, use different colored jams to create a rainbow effect on your cookie platter, or tint white chocolate fillings with food coloring for custom colors that match your holiday décor.
Storing and Gifting Your Homemade Masterpieces
Proper storage is essential for maintaining the quality and freshness of your Christmas thumbprint cookies. Once completely cooled, arrange the cookies in a single layer in an airtight container, separating layers with parchment paper to prevent the jam from sticking. Stored this way at room temperature, the cookies will remain fresh for up to one week. Avoid refrigerating them as this can cause the cookies to become soggy and lose their delightful texture.
For longer storage, thumbprint cookies freeze exceptionally well. Place them in a single layer on a baking sheet and freeze until solid, then transfer to freezer-safe containers or bags with layers separated by parchment paper. Frozen cookies maintain their quality for up to three months. When you’re ready to serve them, simply thaw at room temperature for about an hour—they’ll taste just as fresh as the day they were baked.
These beautiful cookies make wonderful gifts for teachers, neighbors, coworkers, and friends during the holiday season. Arrange them in decorative tins lined with festive tissue paper, or pack them in clear cellophane bags tied with ribbon for a simple yet elegant presentation. Include a small card with the recipe so recipients can recreate these delicious treats at home. For an extra special touch, package different jam flavors together to create an assorted collection that showcases the versatility of this classic recipe.
Bringing It All Together: Your Holiday Baking Success Story
Christmas thumbprint cookies represent everything wonderful about holiday baking—they’re simple enough for beginners yet impressive enough to serve at the most elegant gatherings. The combination of buttery, tender cookies with sweet, fruity jam centers creates a flavor and texture experience that appeals to all ages. Whether you’re continuing a family tradition or starting a new one, these cookies are sure to become a beloved part of your holiday celebrations for years to come.
The joy of baking these cookies extends far beyond the delicious final product. It’s about the memories created while pressing thumbs into dough, the anticipation as the cookies bake and fill your home with their wonderful aroma, and the satisfaction of presenting a beautiful platter of homemade treats. In our fast-paced world, taking time to bake from scratch is a gift we give ourselves and our loved ones—a reminder of simpler times and the importance of traditions that bring us together.
So gather your ingredients, preheat that oven, and prepare to create something truly special. These Christmas thumbprint cookies are more than just a recipe—they’re an invitation to slow down, enjoy the process, and share the sweetness of the season with everyone you love. Happy baking, and may your holidays be filled with warmth, joy, and plenty of delicious homemade cookies!