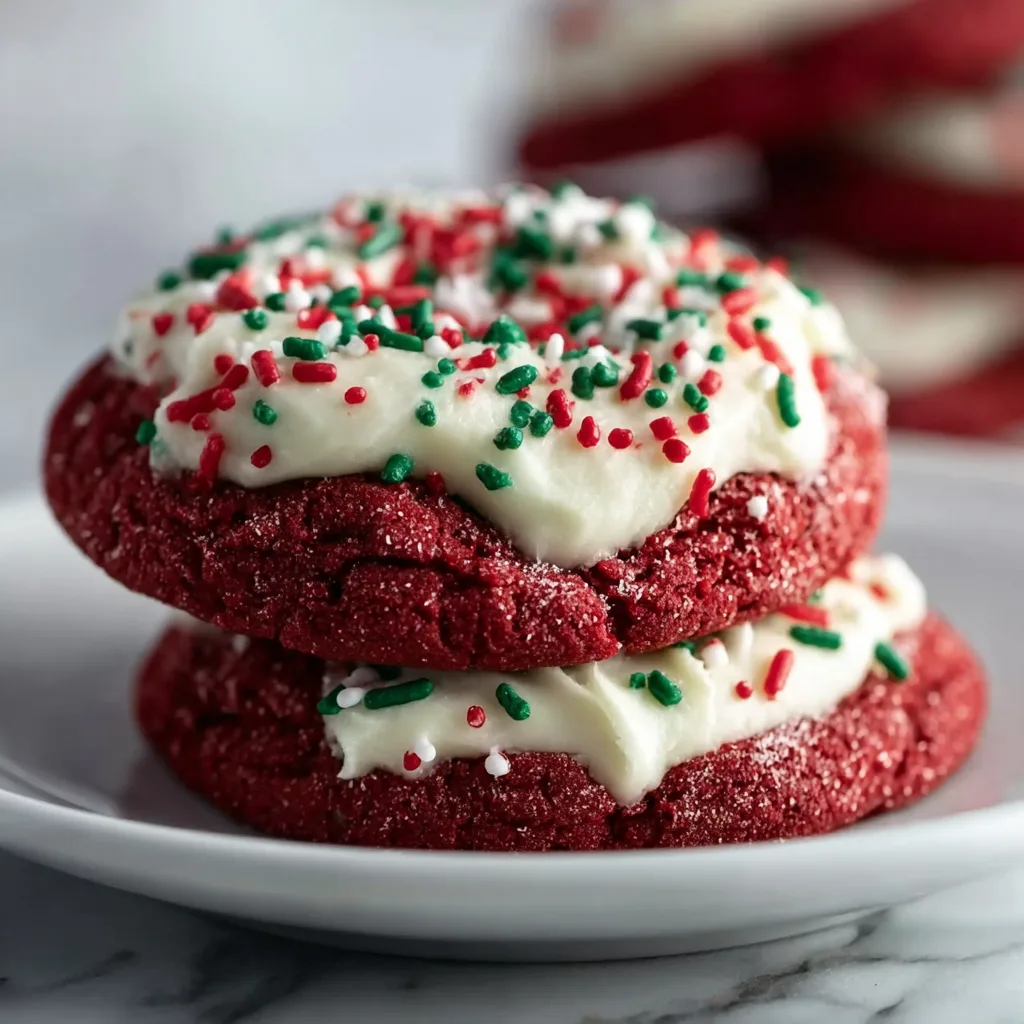
Red Velvet Cookies: A Festive Twist on a Classic
There’s something undeniably magical about red velvet desserts. The rich crimson hue, the subtle cocoa flavor, and that iconic tangy cream cheese frosting combine to create a treat that’s both elegant and indulgent. While red velvet cake has long been a beloved classic, red velvet cookies offer all that deliciousness in a more portable, shareable form. These soft, chewy cookies topped with luscious cream cheese frosting are perfect for holiday gatherings, cookie exchanges, or simply treating yourself to something special.

Red velvet cookies have become increasingly popular in recent years, and it’s easy to see why. They capture the essence of traditional red velvet cake but in a format that’s easier to make, serve, and enjoy. Whether you’re an experienced baker or just starting your culinary journey, this recipe will guide you through creating bakery-quality red velvet cookies right in your own kitchen. The vibrant red color makes them especially festive for Christmas, Valentine’s Day, or any celebration where you want to make a visual impact.
The History Behind Red Velvet Perfection
The origins of red velvet cake trace back to the Victorian era when “velvet” cakes became popular for their incredibly soft, fine-crumb texture. The red color originally came from a chemical reaction between natural cocoa powder and acidic ingredients like buttermilk and vinegar. During the Great Depression and World War II, red velvet cake gained prominence when a Texas company began marketing red food coloring alongside a recipe, cementing the dessert’s signature appearance.
Today, red velvet has evolved beyond its cake origins. Bakers have transformed this classic flavor profile into cupcakes, brownies, cheesecakes, and of course, these delightful cookies. The adaptation to cookie form maintains all the beloved characteristics while adding a chewy texture that many find even more appealing than the original cake version. The addition of cream cheese frosting and festive sprinkles elevates these cookies from simple treats to show-stopping desserts worthy of any special occasion.
Why These Red Velvet Cookies Stand Out
What sets exceptional red velvet cookies apart from ordinary ones is achieving the perfect balance of flavors and textures. These cookies should be soft and tender with a slight chewiness, never dry or cakey. The cocoa flavor should be subtle, complementing rather than overwhelming the buttery richness. The cream cheese frosting must be tangy enough to cut through the sweetness while maintaining a smooth, spreadable consistency that doesn’t melt or slide off the cookie.
The visual appeal is equally important. A deep, vibrant red color signals indulgence and creates excitement before the first bite. The contrast between the rich red cookie and pristine white frosting is visually stunning, especially when adorned with festive sprinkles. These cookies don’t just taste amazing—they photograph beautifully and make impressive additions to dessert tables, gift boxes, or holiday platters.
Ingredients
For the Cookies:
- 2 cups all-purpose flour
- 2 tablespoons unsweetened cocoa powder
- 1 teaspoon baking soda
- 1/2 teaspoon salt
- 1/2 cup unsalted butter, softened
- 1 cup granulated sugar
- 1 large egg
- 1 teaspoon vanilla extract
- 1 tablespoon red food coloring (liquid or gel)
- 1 teaspoon white vinegar
- 3/4 cup buttermilk
For the Cream Cheese Frosting:
- 8 oz cream cheese, softened
- 1/4 cup unsalted butter, softened
- 2 cups powdered sugar
- 1 teaspoon vanilla extract
- Pinch of salt
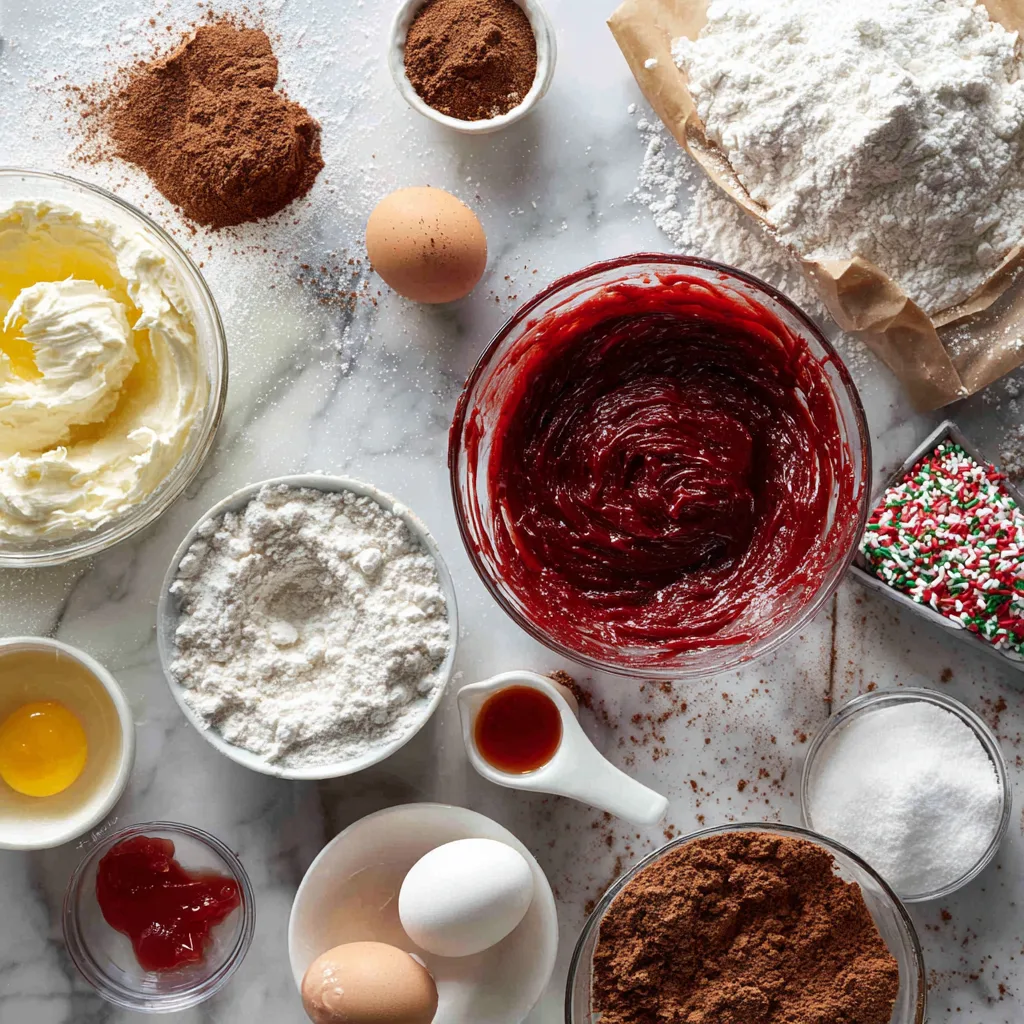
For Decoration:
- Red and green sprinkles
- Additional powdered sugar for dusting (optional)
Instructions
- Preheat your oven to 350°F (175°C) and line two baking sheets with parchment paper or silicone baking mats to prevent sticking and ensure even baking.
- In a medium mixing bowl, whisk together the all-purpose flour, unsweetened cocoa powder, baking soda, and salt until thoroughly combined. Set this dry mixture aside for later use.
- In a large mixing bowl, cream together the softened butter and granulated sugar using an electric mixer on medium-high speed for about 3-4 minutes until the mixture becomes light, fluffy, and pale in color.
- Add the egg to the butter mixture and beat until fully incorporated, scraping down the sides of the bowl as needed. Mix in the vanilla extract, red food coloring, and white vinegar until the mixture turns a vibrant red color.
- With the mixer on low speed, alternately add the flour mixture and buttermilk to the wet ingredients, beginning and ending with the flour mixture. Add about one-third of the flour, mix briefly, then add half the buttermilk, mix, add another third of flour, remaining buttermilk, and finally the last portion of flour. Mix just until combined—avoid overmixing to ensure tender cookies.
- Using a cookie scoop or spoon, drop rounded tablespoons of dough onto the prepared baking sheets, spacing them about 2 inches apart to allow for spreading during baking. Each cookie should be roughly the same size for even baking.
- Bake in the preheated oven for 10-12 minutes, or until the edges are set and the centers appear slightly underdone. The cookies will continue cooking on the hot baking sheet after removal from the oven. Do not overbake, as this will result in dry cookies.
- Allow the cookies to cool on the baking sheet for 5 minutes before carefully transferring them to a wire rack to cool completely. This cooling period is crucial—frosting warm cookies will cause the frosting to melt and slide off.
- While the cookies cool, prepare the cream cheese frosting. In a large bowl, beat the softened cream cheese and butter together with an electric mixer on medium speed until smooth and creamy with no lumps remaining.
- Gradually add the powdered sugar, about half a cup at a time, beating on low speed initially to prevent a sugar cloud, then increasing to medium-high speed. Add the vanilla extract and a pinch of salt, then beat for an additional 2-3 minutes until the frosting is light, fluffy, and spreadable.
- Once the cookies are completely cool, spread or pipe a generous amount of cream cheese frosting onto the flat side of each cookie. You can use an offset spatula for a rustic look or a piping bag fitted with a round tip for more precise application.
- Immediately after frosting, sprinkle the red and green holiday sprinkles over the frosting while it’s still soft so they adhere properly. Press gently if needed to help them stick.
Red Velvet Cookies
Ingredients
Equipment
Method
- Preheat oven to 350°F (175°C) and line two baking sheets with parchment paper or silicone baking mats.
- In a medium bowl, whisk together flour, cocoa powder, baking soda, and salt. Set aside.
- In a large bowl, cream softened butter and sugar with an electric mixer on medium-high speed for 3-4 minutes until light and fluffy.
- Add egg and beat until incorporated. Mix in vanilla extract, red food coloring, and white vinegar until vibrant red.
- On low speed, alternately add flour mixture and buttermilk to wet ingredients, beginning and ending with flour. Mix just until combined.
- Using a cookie scoop, drop rounded tablespoons of dough onto prepared baking sheets, spacing 2 inches apart.
- Bake for 10-12 minutes until edges are set and centers appear slightly underdone. Cool on baking sheet for 5 minutes.
- Transfer cookies to wire rack and cool completely before frosting.
- For frosting, beat cream cheese and butter together until smooth and creamy with no lumps.
- Gradually add powdered sugar, beating on low then increasing to medium-high. Add vanilla and salt, beat 2-3 minutes until fluffy.
- Spread or pipe frosting onto cooled cookies, then immediately top with red and green sprinkles.
- Serve immediately or store frosted cookies in refrigerator in airtight container for up to 4 days.
Notes
Mastering the Perfect Texture
The key to achieving perfectly soft red velvet cookies lies in several critical factors. First, ensure your butter is properly softened to room temperature—not melted, but soft enough that you can easily press your finger into it. This allows for proper creaming with the sugar, which incorporates air and creates a lighter texture. Room temperature eggs also blend more smoothly into the batter.
Measuring flour correctly is essential. Too much flour results in dry, dense cookies. Use the spoon-and-level method: spoon flour into your measuring cup and level it off with a knife rather than scooping directly from the bag, which compacts the flour and leads to using too much. The buttermilk provides both moisture and the slight tanginess characteristic of red velvet, so don’t substitute regular milk without also adding the vinegar for acidity.
Baking time is crucial—these cookies should look slightly underdone when you remove them from the oven. They’ll appear soft and puffy with set edges but slightly gooey centers. As they cool on the baking sheet, carryover heat continues the baking process, resulting in perfectly soft cookies. Overbaking is the most common mistake, leading to dry, crumbly cookies rather than the desired tender texture.
Creating the Ultimate Cream Cheese Frosting
The cream cheese frosting can make or break your red velvet cookies. Both the cream cheese and butter must be at room temperature—cold ingredients will create a lumpy frosting, while ingredients that are too warm will make a runny mess. If you forgot to soften them in advance, cut them into small cubes and let them sit for about 30 minutes.
When mixing, start slowly to avoid powdered sugar explosions, then increase speed once incorporated. Beat the frosting longer than you think necessary—at least 3-4 minutes of vigorous beating incorporates air, making the frosting lighter and fluffier rather than dense and heavy. If your frosting is too thick to spread easily, add a teaspoon of milk or cream. If it’s too thin, add more powdered sugar a tablespoon at a time.
For the best results, frost cookies within a few hours of serving. While the cookies themselves store well, the frosting can soften over time, especially in warm conditions. If you need to make them ahead, you can freeze unfrosted cookies for up to three months, then thaw and frost them the day of your event for a fresh-baked appearance and taste.
Creative Variations and Customizations
While classic red velvet cookies with cream cheese frosting are delicious as-is, there are numerous ways to customize this recipe. For a chocolate twist, add white chocolate chips or chunks to the cookie dough. The sweet white chocolate pairs beautifully with the subtle cocoa and tangy frosting. Mini chocolate chips work wonderfully too, adding pockets of rich chocolate throughout each bite.
Consider making sandwich cookies by pairing two cookies with a thick layer of cream cheese frosting between them, similar to whoopie pies. This doubles the frosting-to-cookie ratio, which many people prefer. You could also dip half of each frosted cookie in melted white chocolate for an elegant presentation or roll the edges in crushed peppermint candy for a winter wonderland effect.
For different occasions, adjust the sprinkle colors—pink and white for Valentine’s Day, pastel colors for Easter, or red, white, and blue for patriotic holidays. You can also add extracts like almond or peppermint to both the cookies and frosting for unique flavor variations. Some bakers swear by adding espresso powder to enhance the chocolate notes without making the cookies taste like coffee.
Storage and Make-Ahead Tips
Proper storage ensures your red velvet cookies maintain their soft texture and fresh taste. Unfrosted cookies can be stored in an airtight container at room temperature for up to 5 days or frozen for up to 3 months. When freezing, place parchment paper between layers to prevent sticking, and thaw at room temperature for about an hour before frosting.
Frosted cookies should be stored in a single layer in an airtight container in the refrigerator for up to 4 days. The cream cheese frosting requires refrigeration to prevent spoilage. Remove them from the refrigerator about 30 minutes before serving to take the chill off—they taste best at cool room temperature rather than cold.
The cookie dough can be prepared ahead and refrigerated for up to 3 days or frozen for up to 3 months. If freezing dough, scoop it into individual portions first, freeze on a baking sheet until solid, then transfer to a freezer bag. You can bake frozen dough balls directly from the freezer, adding 1-2 minutes to the baking time. This make-ahead option is perfect for having fresh-baked cookies anytime with minimal effort.
Troubleshooting Common Issues
If your cookies spread too much during baking, the dough may be too warm. Chill the dough for 30 minutes before baking, and ensure your baking sheets are cool between batches. Using melted butter instead of softened butter also causes excessive spreading. Conversely, if cookies are too thick and cakey, you may have added too much flour or not enough liquid.
For cookies that come out dry rather than soft, the most likely culprit is overbaking. Remember, they should look slightly underdone when removed from the oven. Using old leavening agents (baking soda) can also affect texture—these ingredients lose potency over time, so replace them every 6 months for best results. Overmixing the dough develops too much gluten, leading to tough cookies, so mix just until ingredients are combined.
If your red color isn’t vibrant enough, increase the food coloring by a teaspoon or two. Gel food coloring provides more intense color with less liquid, though liquid coloring works fine with slight adjustments to other liquids if needed. Some natural cocoa powders react with the acidic ingredients to create a reddish tint, while others don’t, so color intensity can vary based on your cocoa brand.
Serving Suggestions and Presentation Ideas
Red velvet cookies are versatile enough for casual snacking or elegant entertaining. For a simple presentation, arrange them on a white platter or cake stand where the red color really pops. Add fresh mint leaves or sugared cranberries around the edges for a festive touch. During holidays, place them in decorative tins or boxes lined with tissue paper for beautiful homemade gifts.
Create a dessert board by combining red velvet cookies with other complementary treats like brownies, white chocolate bark, fresh strawberries, and nuts. The variety of colors, textures, and flavors makes for an impressive spread that encourages guests to sample multiple items. Pair these cookies with hot chocolate, coffee, or a glass of cold milk for the ultimate indulgent experience.
For parties, consider making mini versions using a smaller cookie scoop. Bite-sized cookies disappear quickly and allow guests to try multiple desserts without feeling too full. You can also set up a cookie decorating station with extra frosting, various sprinkles, and edible glitter, letting guests (especially children) customize their own cookies for an interactive dessert experience.
Bringing Joy Through Homemade Baking
There’s something deeply satisfying about baking cookies from scratch, especially when the results are as impressive as these red velvet beauties. The process itself can be therapeutic—measuring ingredients, watching dough come together, and filling your home with the warm, sweet aroma of baking cookies creates moments of joy in our busy lives. Sharing these cookies with others multiplies that joy, creating connections and memories.
Whether you’re baking for a special occasion or simply because you deserve something sweet, these red velvet cookies deliver on every level. They combine nostalgic flavors with eye-catching presentation, creating treats that taste as good as they look. The soft, tender texture paired with rich cream cheese frosting makes each bite a moment worth savoring.
Sweet Conclusions
Red velvet cookies represent the perfect intersection of classic flavors and modern convenience. They capture everything we love about traditional red velvet cake while offering the grab-and-go ease of cookies. This recipe produces consistently excellent results—soft, flavorful cookies with just the right amount of cocoa and that signature tangy frosting we all crave.
The versatility of these cookies makes them suitable for any occasion throughout the year, though they shine especially bright during the holiday season. Their stunning appearance makes them conversation starters at parties, while their delicious taste ensures they won’t last long on any dessert table. Whether you’re an experienced baker or trying red velvet for the first time, this recipe will become a treasured addition to your collection, one you’ll turn to again and again when you want to create something truly special.