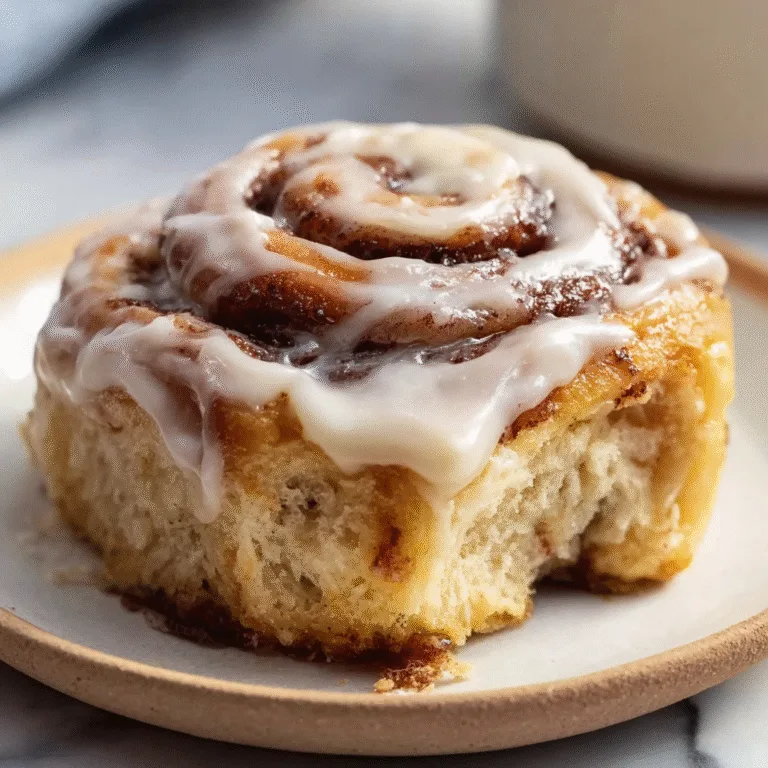
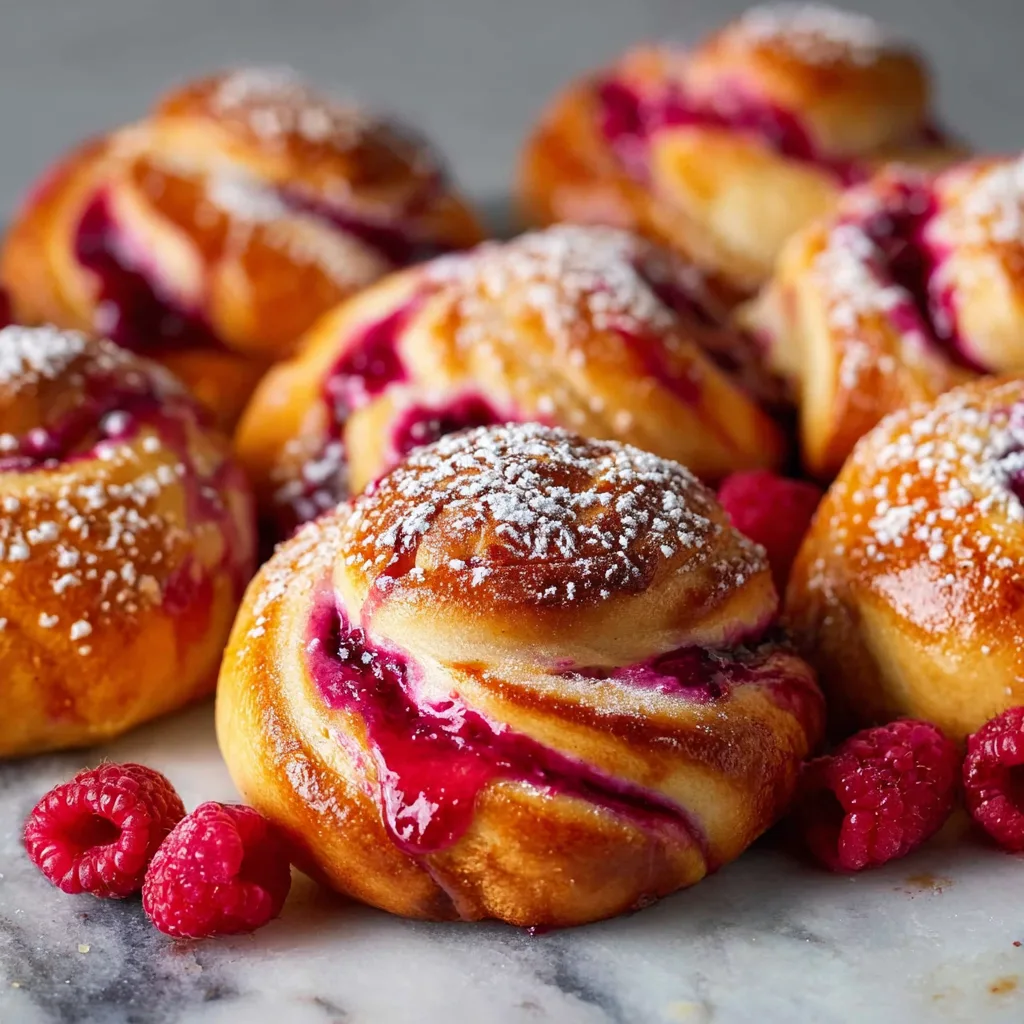
Sweet Raspberry Buns: Heavenly Homemade Pastries That Melt in Your Mouth
There’s something undeniably magical about the aroma of freshly baked sweet raspberry buns wafting through your kitchen on a lazy weekend morning. These pillowy soft, golden-brown pastries filled with luscious raspberry goodness represent the perfect marriage between tender yeast dough and vibrant fruit filling. Whether you’re looking to impress guests at brunch, treat your family to a special breakfast, or simply indulge in a bakery-quality treat made in your own home, these sweet raspberry buns deliver on every level.
The beauty of homemade raspberry buns lies not just in their incredible taste but also in the therapeutic process of creating them from scratch. There’s a certain satisfaction that comes from watching simple ingredients transform into beautiful swirled pastries that rival anything you’d find at an upscale bakery. Unlike store-bought varieties laden with preservatives and artificial flavors, these homemade versions burst with authentic raspberry flavor and feature a tender crumb that stays soft for days.
What sets these sweet raspberry buns apart from other breakfast pastries is their versatility and crowd-pleasing appeal. They work equally well as a decadent breakfast treat, an afternoon snack with coffee, or even a delightful dessert option. The combination of buttery dough, sweet-tart raspberry filling, and a delicate dusting of powdered sugar creates a flavor profile that appeals to both children and adults alike. Plus, they’re surprisingly approachable for home bakers of all skill levels, making them an excellent project for those looking to expand their baking repertoire.
The history of sweet fruit-filled buns spans across numerous cultures and baking traditions. From Scandinavian cinnamon buns to Eastern European kolaches, the concept of enriched yeast dough wrapped around sweet fillings has been perfected over centuries. Raspberries, with their perfect balance of sweetness and acidity, create an especially harmonious filling that complements the rich, buttery dough without overwhelming it. The glossy, thick raspberry filling not only adds incredible flavor but also creates those beautiful magenta swirls that make these buns so visually appealing.
Why This Recipe Works Like Magic
Understanding what makes a great raspberry bun recipe helps ensure success every time you bake. The secret lies in achieving the perfect balance between dough texture, filling consistency, and baking technique. This recipe has been carefully developed to produce buns that are tender without being dense, flavorful without being overly sweet, and beautiful without requiring professional pastry skills.
The dough itself is an enriched yeast dough, meaning it contains butter, eggs, and milk in addition to the basic flour, water, and yeast combination. These enrichments serve multiple purposes. The butter adds flavor and tenderness while also contributing to the golden color of the baked buns. The eggs provide structure and richness, creating that characteristic soft, pillowy texture we associate with premium bakery pastries. The milk adds additional tenderness and helps create a fine, even crumb structure that makes each bite melt in your mouth.

One of the most crucial aspects of this recipe is the raspberry filling consistency. Unlike some fruit fillings that become runny during baking, this version maintains a thick, gooey texture that stays put inside the buns rather than leaking out. Achieving this perfect consistency involves using a combination of fresh or frozen raspberries that have been cooked down slightly to concentrate their flavor and evaporate excess moisture. The addition of a small amount of cornstarch helps thicken the filling to just the right viscosity, creating those gorgeous glossy pools of raspberry goodness that make these buns so irresistible.
The shaping technique employed in this recipe ensures that the raspberry filling remains evenly distributed throughout each bun while creating those signature swirls that look so impressive. By rolling the dough into individual portions and then creating a spiral or twist, you maximize the surface area of raspberry filling exposed, which intensifies the fruit flavor in every bite. This technique also creates natural pockets where powdered sugar can nestle, adding little bursts of sweetness throughout.
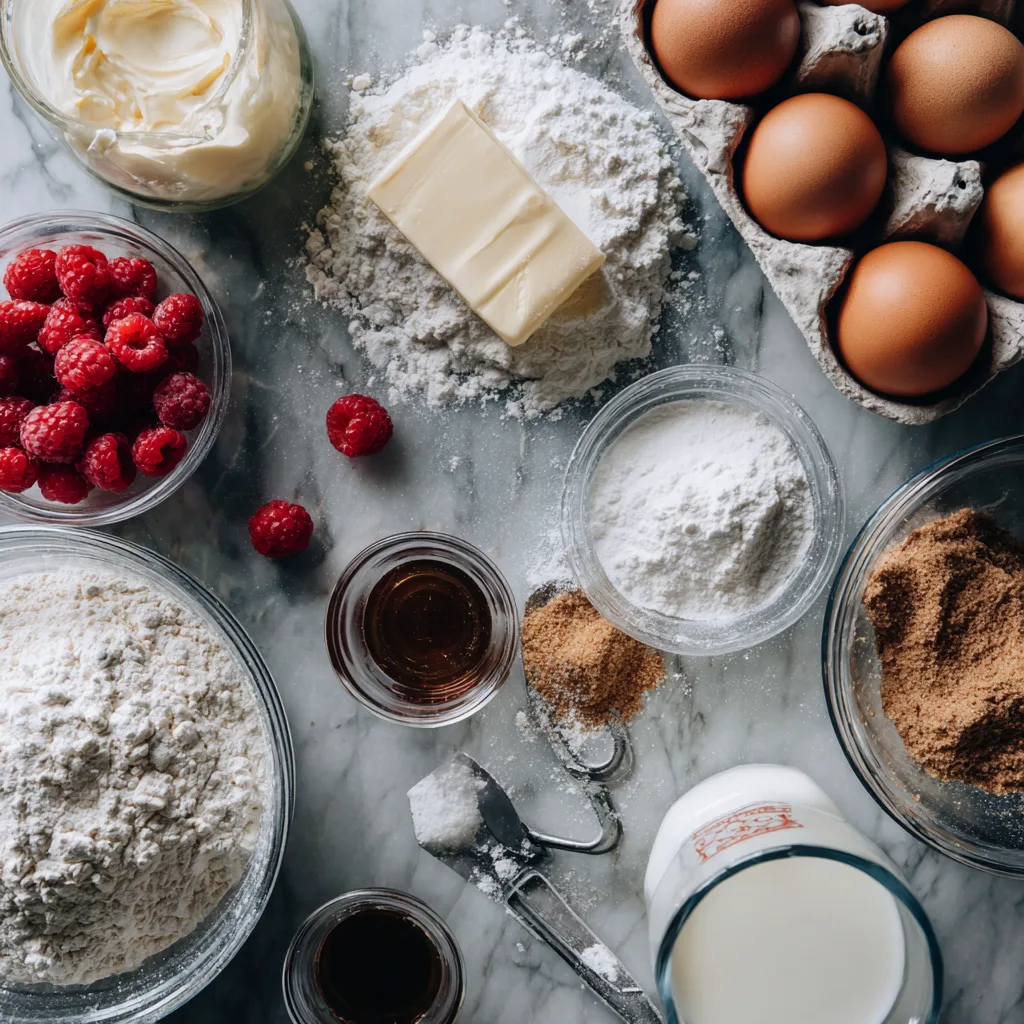
Ingredients
- 3 ½ cups all-purpose flour
- ¼ cup granulated sugar
- 1 packet (2 ¼ teaspoons) active dry yeast
- 1 teaspoon salt
- 1 cup whole milk, warmed
- ⅓ cup unsalted butter, melted
- 2 large eggs, room temperature
- 1 teaspoon vanilla extract
- 2 cups fresh or frozen raspberries
- ½ cup granulated sugar (for filling)
- 2 tablespoons cornstarch
- 2 tablespoons lemon juice
- Powdered sugar for dusting
- Fresh raspberries for garnish
Instructions
- In a large mixing bowl, combine 2 cups of flour, sugar, yeast, and salt, whisking together until evenly distributed throughout the dry ingredients.
- Create a well in the center of the dry mixture and pour in the warmed milk, melted butter, eggs, and vanilla extract, stirring with a wooden spoon until a shaggy dough begins to form.
- Gradually add the remaining flour, one-half cup at a time, mixing thoroughly between additions until the dough comes together and pulls away from the sides of the bowl, forming a soft but manageable consistency.
- Turn the dough out onto a lightly floured surface and knead for approximately 8-10 minutes until it becomes smooth, elastic, and slightly tacky to the touch but not sticky.
- Place the kneaded dough in a lightly greased bowl, turning once to coat all surfaces, then cover with a clean kitchen towel and allow to rise in a warm, draft-free location for 1-1.5 hours until doubled in size.
- While the dough rises, prepare the raspberry filling by combining raspberries, sugar, cornstarch, and lemon juice in a medium saucepan over medium heat, stirring frequently as the mixture comes to a gentle simmer.
- Continue cooking the raspberry mixture for 5-7 minutes, mashing the berries slightly with the back of a spoon, until the filling thickens to a jam-like consistency with a glossy appearance, then remove from heat and allow to cool completely.
- Once the dough has doubled, punch it down gently to release air bubbles, then turn out onto a floured surface and divide into 8-10 equal portions using a bench scraper or sharp knife.
- Roll each portion into a long rope approximately 10 inches in length, then flatten slightly and spread a generous tablespoon of cooled raspberry filling down the center, leaving a small border around the edges.
- Fold the dough over the filling lengthwise, pinching the seam closed firmly, then twist the filled rope gently into a spiral shape and tuck the end underneath to create a round bun shape.
- Place the shaped buns on a parchment-lined baking sheet, spacing them approximately 2 inches apart, then cover loosely with plastic wrap and allow to rise for an additional 30-45 minutes until puffy.
- Preheat your oven to 375°F (190°C) during the final 15 minutes of the second rise, ensuring the oven reaches proper temperature before baking.
- Bake the risen buns for 18-22 minutes until they turn golden brown on top and bottom, with the raspberry filling bubbling slightly and creating glossy pools of fruit.
- Remove the baked buns from the oven and transfer to a wire cooling rack, allowing them to cool for at least 15 minutes before dusting generously with powdered sugar and garnishing with fresh raspberries.
Sweet Raspberry Buns
Ingredients
Equipment
Method
- In a large mixing bowl, combine 2 cups flour, sugar, yeast, and salt, whisking together until evenly distributed.
- Create a well in the center and pour in warmed milk, melted butter, eggs, and vanilla extract, stirring until a shaggy dough forms.
- Gradually add remaining flour, one-half cup at a time, mixing until dough comes together and pulls away from bowl sides.
- Turn dough onto a lightly floured surface and knead for 8-10 minutes until smooth, elastic, and slightly tacky.
- Place dough in a lightly greased bowl, turning once to coat, then cover and let rise in a warm place for 1-1.5 hours until doubled.
- While dough rises, combine raspberries, sugar, cornstarch, and lemon juice in a saucepan over medium heat, stirring frequently.
- Cook for 5-7 minutes, mashing berries slightly, until mixture thickens to jam-like consistency. Remove from heat and cool completely.
- Punch down risen dough, turn out onto floured surface, and divide into 8-10 equal portions.
- Roll each portion into a 10-inch rope, flatten slightly, and spread a tablespoon of raspberry filling down the center.
- Fold dough over filling lengthwise, pinch seam closed, then twist into a spiral and tuck end underneath to form round bun.
- Place shaped buns on parchment-lined baking sheet, spacing 2 inches apart, cover loosely, and let rise 30-45 minutes until puffy.
- Preheat oven to 375°F (190°C) during final 15 minutes of second rise.
- Bake for 18-22 minutes until golden brown with filling bubbling slightly.
- Transfer to wire rack, cool at least 15 minutes, then dust with powdered sugar and garnish with fresh raspberries.
Notes
Mastering the Perfect Dough Texture
Achieving the ideal dough consistency is perhaps the most critical step in creating exceptional sweet raspberry buns. The dough should feel soft and slightly tacky when properly kneaded, but it shouldn’t stick aggressively to your hands or work surface. If you find the dough too sticky during kneading, resist the temptation to add too much additional flour, as this can result in dense, heavy buns. Instead, add flour sparingly, one tablespoon at a time, and allow the gluten structure to develop fully through continued kneading.
The temperature of your ingredients plays a surprisingly important role in yeast dough success. Your milk should be warmed to approximately 110°F (43°C), which feels comfortably warm to the touch but not hot. Milk that’s too hot will kill the yeast, preventing the dough from rising properly, while milk that’s too cool will slow yeast activity significantly, requiring much longer rise times. Similarly, using room temperature eggs helps the dough come together more cohesively and encourages even fermentation throughout the rising process.
Kneading develops the gluten network that gives these buns their characteristic tender yet structured texture. While it’s possible to over-knead dough using a stand mixer, it’s nearly impossible to over-knead by hand. Proper kneading should take 8-10 minutes and transform the shaggy, rough dough into a smooth, elastic ball. You’ll know the dough is ready when it springs back slowly when poked and feels smooth and supple under your hands. The windowpane test, where you stretch a small piece of dough thin enough to see light through it without tearing, provides definitive confirmation that gluten development is complete.
Creating That Irresistible Raspberry Filling
The raspberry filling is what truly elevates these buns from good to extraordinary. While you might be tempted to simply use store-bought raspberry jam, cooking down fresh or frozen raspberries creates a filling with superior flavor and the perfect thick, gooey consistency. Fresh raspberries work beautifully when they’re in season, but frozen raspberries are equally delicious and often more economical, making this recipe accessible year-round.
The cooking process serves multiple purposes beyond simply heating the berries. As the raspberries cook, their cell walls break down, releasing natural pectin and juice. This creates the base for your filling while simultaneously concentrating the raspberry flavor through evaporation. The addition of sugar not only sweetens the filling but also helps draw out moisture and contributes to the glossy, jewel-like appearance of the finished product. Cornstarch acts as a thickener, preventing the filling from becoming too runny during baking when the heat could otherwise cause it to liquify and leak out of the buns.
Lemon juice might seem like a minor ingredient, but it serves an important purpose in balancing the sweetness and enhancing the overall raspberry flavor. The acidity brightens the fruit taste and prevents the filling from becoming one-dimensionally sweet. It also helps activate the pectin naturally present in raspberries, contributing to a better set. Allow your filling to cool completely before using it to shape your buns. Warm filling will be too fluid to work with effectively and could also kill the yeast in your dough if it comes into direct contact during shaping.
Shaping Techniques for Beautiful Results
The shaping process transforms your risen dough and thick raspberry filling into those gorgeous swirled buns that look like they came from a professional bakery. There are several approaches to shaping raspberry buns, each creating a slightly different appearance while maintaining the same delicious taste. The spiral technique described in this recipe creates maximum visual impact with beautiful swirls of filling visible on the surface of each bun.
When rolling your dough portions into ropes, aim for consistency in thickness from end to end. This ensures even baking and uniform appearance across your entire batch. Don’t worry if your first few attempts at shaping aren’t perfect. Even slightly irregular buns will taste amazing and develop their own rustic charm. The key is ensuring that your seams are well-sealed to prevent filling from leaking during baking. A light brush of water along the seam before pinching it closed helps create a better seal.
During the second rise, your shaped buns will puff up significantly, and you might notice some raspberry filling beginning to peek through small gaps in the dough. This is completely normal and actually adds to the rustic, homemade appeal of the finished buns. Those little spots where filling shows through will caramelize slightly during baking, creating intensely flavored pockets that contrast beautifully with the tender dough.
Storage and Serving Suggestions
Fresh sweet raspberry buns are at their absolute best on the day they’re baked, when the exterior maintains a slight crispness while the interior stays impossibly soft. However, proper storage ensures you can enjoy these treats for several days after baking. Once completely cooled, store the buns in an airtight container at room temperature for up to three days. Avoid refrigerating them, as this actually causes bread products to go stale faster through a process called retrogradation.
For longer storage, these buns freeze exceptionally well. Place cooled buns in a freezer-safe bag or container, separating layers with parchment paper to prevent sticking. They’ll maintain excellent quality for up to three months in the freezer. To serve, thaw frozen buns at room temperature for several hours or overnight, then refresh them in a 300°F (150°C) oven for 5-7 minutes to restore that fresh-baked texture. Dust with fresh powdered sugar just before serving for the most attractive presentation.
These versatile buns shine in numerous serving contexts. Present them as the centerpiece of a weekend brunch spread alongside fresh fruit, yogurt, and coffee. Pack them in lunch boxes for a special midday treat that’s sure to brighten anyone’s day. Serve them warm with a scoop of vanilla ice cream for an unexpected dessert that combines the comfort of fresh baking with the indulgence of frozen cream. The possibilities are limited only by your imagination.
Conclusion: Your Journey to Bakery-Quality Raspberry Buns
Creating homemade sweet raspberry buns might seem intimidating at first, but with this detailed recipe and guidance, you have everything needed to produce bakery-quality results in your own kitchen. The process of making these buns offers not just a delicious end product but also the satisfying experience of working with yeast dough and watching simple ingredients transform into something truly special. The thick, gooey raspberry filling, tender golden dough, and delicate powdered sugar topping combine to create a treat that’s worth every minute spent preparing it.
Don’t be discouraged if your first batch isn’t absolutely perfect. Bread baking is as much art as science, and each attempt teaches valuable lessons about dough handling, shaping techniques, and oven behavior. Even slightly imperfect buns will taste incredible and disappear quickly when served warm from the oven. The most important ingredients in any baking project are patience, attention to detail, and a willingness to learn from each experience.
As you gain confidence with this recipe, feel free to experiment with variations. Try different berry fillings like blackberry or mixed berry. Add a cream cheese element to the filling for extra richness. Experiment with different shaping techniques to create new visual presentations. The foundation of great yeast dough and properly prepared fruit filling provided in this recipe serves as a versatile canvas for your creativity. Before long, you’ll find yourself baking these sweet raspberry buns regularly, delighting family and friends with your homemade pastry skills and creating memories that center around the warmth and comfort of fresh baking.