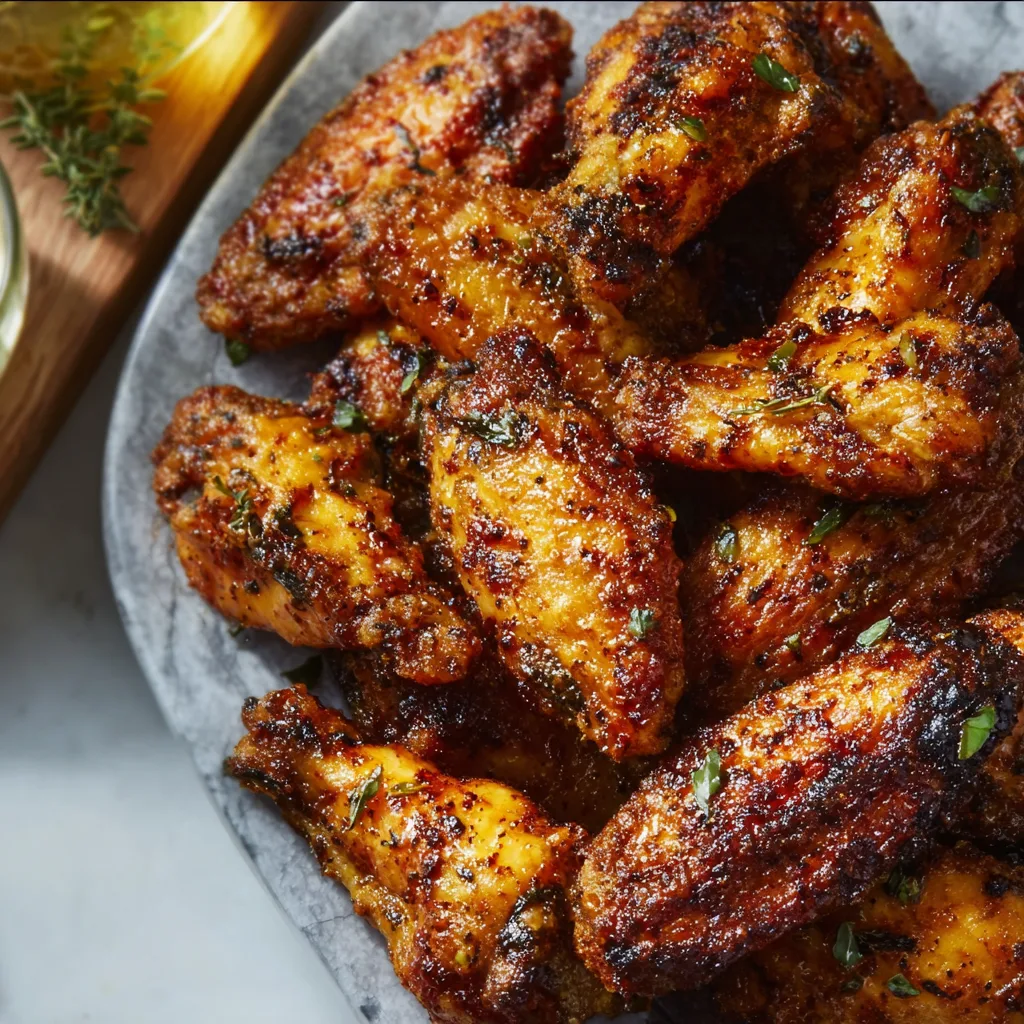
Crispy Baked Chicken Wings Recipe (No Fryer Needed!)
When it comes to game-day snacks, casual get-togethers, or even a simple family dinner, nothing beats a plate of crispy baked chicken wings fresh from the oven. Perfectly golden, crunchy on the outside, juicy on the inside — these wings are the ultimate combination of flavor, texture, and simplicity.
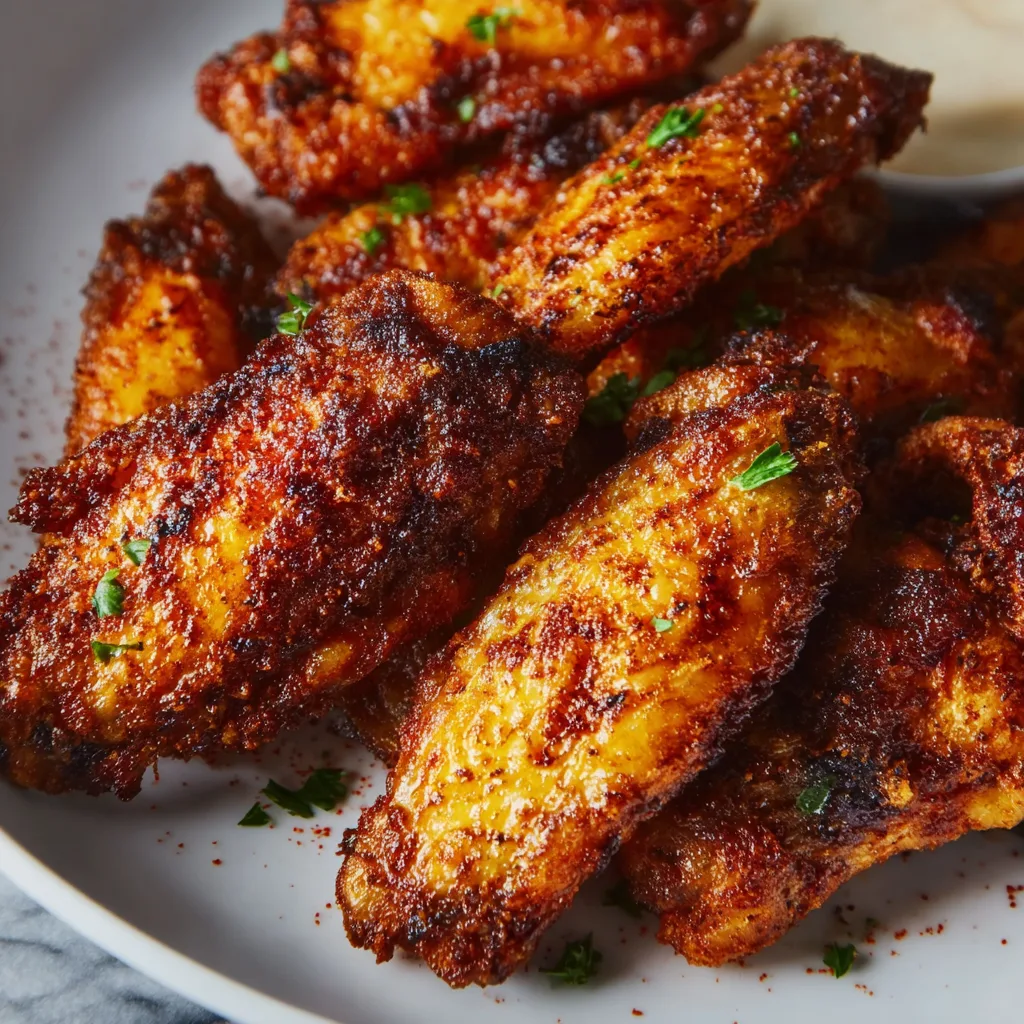
Unlike deep-fried wings, these baked beauties use high-heat oven roasting and a clever coating trick to achieve irresistible crispiness without a drop of oil splatter. Whether you prefer them plain, tossed in buffalo sauce, honey garlic glaze, or smoky BBQ, this method gives you a restaurant-style result right at home.
This recipe focuses on the essentials: texture, seasoning, and baking technique. The key? A little baking powder magic and patience with oven temperature. Ready to transform your wing nights forever? Let’s dive in.
Why You’ll Love These Crispy Baked Wings
- No fryer, no mess – all you need is a baking sheet and oven.
- Crispy without deep frying – baking powder helps draw out moisture for that crunch.
- Healthier alternative – less oil, fewer calories, same satisfaction.
- Customizable – make them spicy, garlicky, or tangy with your favorite sauces.
- Perfect for any occasion – parties, holidays, family dinners, or snack time.
Ingredients
Here’s what you’ll need to make these perfect oven-baked wings:
- 2 pounds chicken wings (split into flats and drumettes)
- 1 tablespoon baking powder (aluminum-free)
- 1 teaspoon salt
- ½ teaspoon black pepper
- 1 teaspoon garlic powder
- 1 teaspoon paprika (smoked or regular)
- ½ teaspoon onion powder
- 2 tablespoons olive oil
- Optional: hot sauce, BBQ sauce, or honey garlic glaze for tossing
- Fresh parsley for garnish

Instructions
1. Prep the Chicken
Pat the chicken wings completely dry with paper towels. This is crucial — moisture prevents crispiness. The drier the wings, the crispier they’ll bake.
2. Season and Coat
In a large mixing bowl, combine the baking powder, salt, pepper, garlic powder, paprika, and onion powder. Add the wings and drizzle with olive oil. Toss thoroughly to ensure every wing is evenly coated with seasoning.
Pro Tip: Using aluminum-free baking powder ensures the wings don’t taste metallic.
3. Prepare the Baking Setup
Preheat your oven to 425°F (220°C). Line a large baking sheet with foil and place a wire rack on top. Spray the rack lightly with cooking spray — this allows air circulation around the wings, helping them crisp evenly.
4. Arrange the Wings
Lay the seasoned wings in a single layer on the rack. Don’t overcrowd; leave space between each piece for maximum airflow and even browning.
5. Bake – First Round
Bake for 30 minutes on the lower oven rack. This allows the fat to render slowly and begin the crisping process.
6. Flip and Bake Again
After 30 minutes, flip the wings and move the tray to the upper rack. Bake for another 20–25 minutes, or until the skin turns deep golden brown and crisp.
7. Optional Sauce Toss
For classic buffalo wings, toss baked wings immediately in a bowl with melted butter and hot sauce. For sticky honey garlic, combine honey, soy sauce, garlic, and a touch of butter — heat until thickened, then coat wings.
8. Serve and Enjoy
Serve hot, garnished with chopped parsley, a side of ranch or blue cheese dressing, and some celery sticks.
Crispy Baked Chicken Wings
Ingredients
Equipment
Method
- Preheat oven to 425°F (220°C). Line a baking sheet with foil and place a wire rack on top. Spray lightly with oil.
- Pat wings completely dry with paper towels.
- Mix baking powder, salt, pepper, garlic powder, paprika, and onion powder in a bowl.
- Add wings and olive oil. Toss until evenly coated.
- Arrange wings on the rack in a single layer, leaving space between them.
- Bake on lower rack for 30 minutes, then flip and bake on upper rack for another 25 minutes or until crispy and golden.
- Optional: Toss in melted butter and hot sauce or BBQ sauce before serving.
- Serve hot with dipping sauces and garnish with parsley.
Notes
Tips for Perfect Crispy Wings
- Dry them well: Moisture is the enemy of crispiness. Use paper towels generously.
- Use baking powder, not baking soda: The powder’s alkalinity raises the skin’s pH, promoting browning and blistering.
- Rack = crisp: Elevating wings allows air to circulate and fat to drip away.
- Don’t skip preheating: Starting in a hot oven helps render fat quickly.
- Finish under broiler (optional): For extra crunch, broil wings for 2–3 minutes at the end — but watch closely!
Flavor Variations
Once you master the base recipe, you can transform these wings into endless flavor combinations:
Buffalo Style
Toss hot wings in a mix of melted butter and your favorite hot sauce (Frank’s RedHot is a classic). Serve with ranch or blue cheese dressing.
Garlic Parmesan
Melt butter, add minced garlic, and toss the baked wings in the mixture. Sprinkle with grated Parmesan and chopped parsley.
Honey BBQ
Combine BBQ sauce with honey and a dash of Worcestershire sauce. Heat until warm, then coat the wings. Sticky, sweet, and smoky perfection.
Asian Glaze
Mix soy sauce, honey, sesame oil, garlic, and ginger. Toss with wings and sprinkle with sesame seeds and chopped green onions.
Serving Suggestions
- Appetizer platter: Serve with celery sticks, carrot sticks, and dipping sauces.
- Game-day feast: Pair with nachos, potato wedges, or onion rings.
- Main course: Serve alongside coleslaw, roasted potatoes, or a crisp garden salad.
- Party snack: Keep a batch warm in the oven while serving to guests — they stay crunchy for up to 30 minutes!
Storage and Reheating
- Refrigerate: Store leftover wings in an airtight container for up to 4 days.
- Freeze: Cool completely, then freeze in a single layer before transferring to a bag or container (up to 2 months).
- Reheat: For best crispiness, reheat in the oven at 375°F (190°C) for 10–12 minutes or air fryer for 5 minutes.
Nutritional Benefits
While these wings are indulgent, baking instead of frying significantly reduces oil and calories. Each serving offers a good source of protein, moderate fat, and minimal carbs — making them great for low-carb or keto-friendly meal plans when served without sugary sauces.
Fun Fact
Did you know that chicken wings were once considered a “throwaway” cut? The rise of Buffalo wings in the 1960s transformed them into one of America’s favorite comfort foods. Now, you can enjoy that same satisfaction — baked, not fried — right at home.
Make-Ahead Tips
You can prep the wings ahead of time for stress-free entertaining:
- Season and coat the wings in advance, then refrigerate (uncovered) for up to 8 hours. This dries out the skin even more for crispier results.
- When ready, bake directly from the fridge — no need to bring to room temperature.
Conclusion
These crispy baked chicken wings are proof that healthy and indulgent can go hand in hand. With minimal prep, a few pantry staples, and smart oven technique, you’ll get that golden, crunchy satisfaction without ever turning on a fryer.
Whether for a Sunday game, family movie night, or weekend snack attack, this recipe is one you’ll return to again and again — because once you’ve tasted perfect baked wings, there’s no going back.