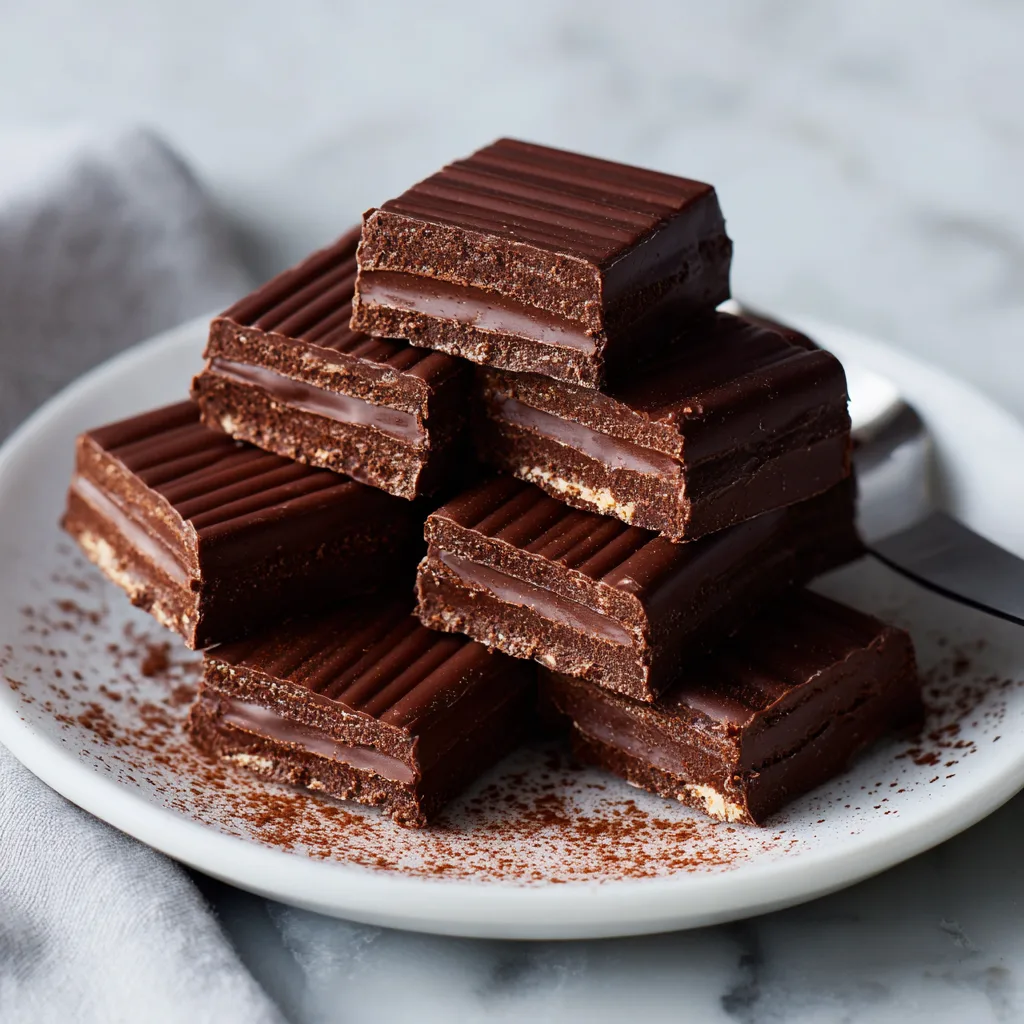
Homemade Classic Chocolate Kit Kat Bars – Gluten-Free & Delicious
If you love crisp wafer cookies coated in silky chocolate, you’re going to fall head over heels for these Homemade Classic Chocolate Kit Kat Bars – Gluten-Free & Delicious. They capture everything nostalgic and satisfying about the iconic chocolate wafer bar—but made entirely from scratch and completely gluten-free.
With crisp gluten-free wafer layers, a creamy chocolate filling, and a glossy chocolate coating, these bars are crunchy, rich, and surprisingly easy to prepare at home. Best of all, they’re a no-bake treat, meaning you don’t need complicated equipment or advanced baking skills.
Whether you’re avoiding gluten or simply love homemade chocolate treats, this copycat kit kat recipe will quickly become a favorite in your dessert rotation.
Why You’ll Love These Homemade Gluten-Free Chocolate Bars
These bars are:
- Completely gluten-free
- No-bake and beginner-friendly
- Perfectly crisp and chocolatey
- Easy to customize
- Great for gifting or parties
Unlike store-bought candy bars, these homemade versions let you control the sweetness, chocolate quality, and texture. The result? A more balanced, rich flavor with a satisfying crunch.

What Makes These Bars Gluten-Free?
Traditional wafer cookies are made with wheat flour, but this recipe uses gluten-free wafer sheets or crisp gluten-free cookies layered together to mimic that classic wafer texture.
You still get that signature snap when you break the bar in half—but without any gluten.
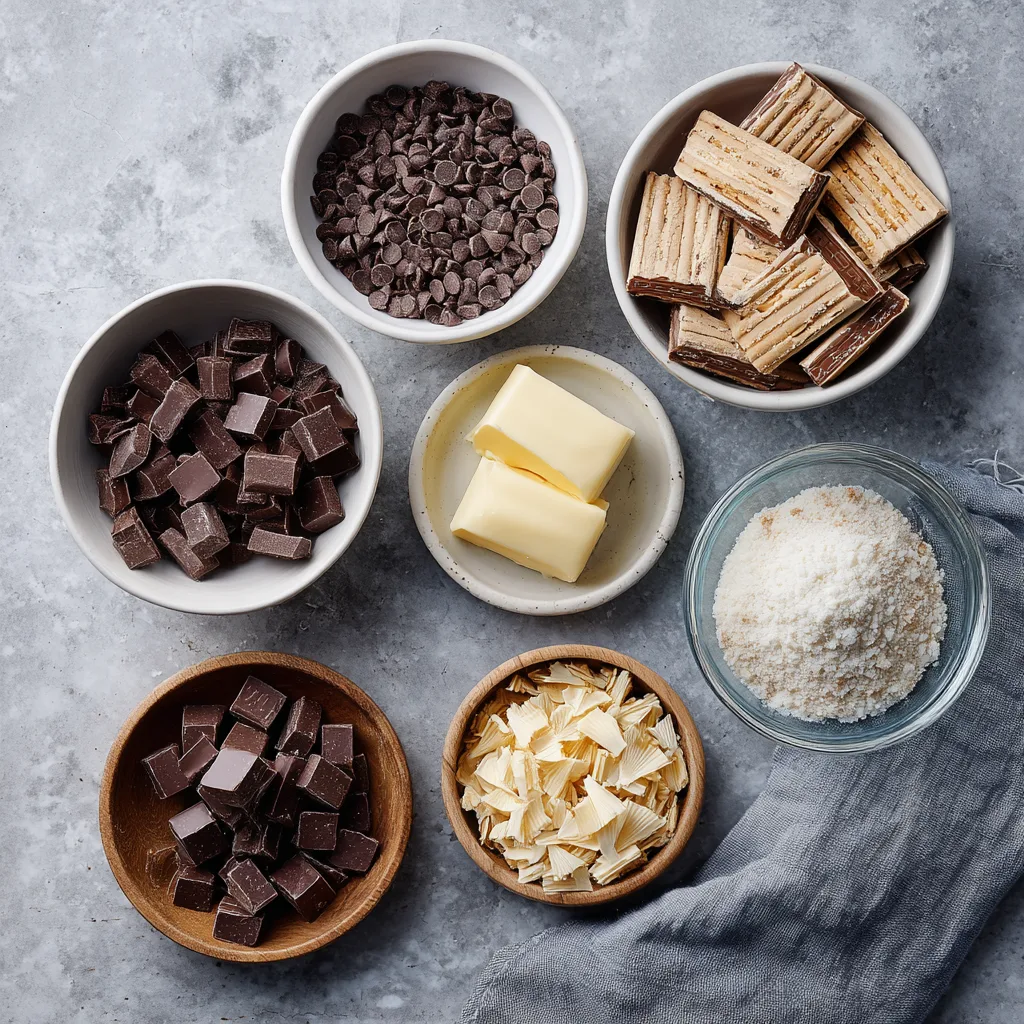
Ingredients
- 2 cups gluten-free wafer sheets or crispy gluten-free cookies (broken into flat layers)
- 2 cups milk chocolate chips (or dairy-free alternative)
- ½ cup dark chocolate chips (optional, for depth)
- 2 tablespoons unsalted butter or coconut oil
- ¼ cup sweetened condensed milk
- 1 teaspoon vanilla extract
- Pinch of salt
Ingredient Notes & Substitutions
Gluten-Free Wafers:
Look for certified gluten-free wafer sheets or use thin, crisp gluten-free cookies.
Chocolate Chips:
Use high-quality chocolate for the best flavor and smooth coating.
Butter or Coconut Oil:
Adds shine and smooth texture to the chocolate coating.
Condensed Milk:
Creates a creamy layer between wafers, mimicking the original candy filling.
Instructions
- Line a small square baking pan with parchment paper, leaving overhang for easy removal.
- Melt milk chocolate chips, dark chocolate (if using), and butter in a heatproof bowl over a pot of simmering water or in short microwave bursts, stirring until smooth.
- Stir in condensed milk, vanilla extract, and a pinch of salt until fully combined.
- Spread a thin layer of melted chocolate mixture on the bottom of the lined pan.
- Place a layer of gluten-free wafer sheets on top, pressing gently.
- Spread another thin layer of chocolate mixture over the wafers.
- Repeat layering wafers and chocolate until you have 3–4 layers, finishing with a smooth chocolate top layer.
- Tap the pan gently on the counter to remove air bubbles.
- Refrigerate for at least 2 hours, or until fully set.
- Remove from pan using parchment overhang. Slice into bars using a sharp knife.
- For cleaner cuts, warm the knife slightly and wipe between slices.
Homemade Classic Chocolate Kit Kat Bars – Gluten-Free & Delicious
Ingredients
Equipment
Method
- Line pan with parchment paper.
- Melt chocolate and butter until smooth.
- Stir in condensed milk, vanilla, and salt.
- Layer chocolate and wafers, repeating until layered.
- Chill 2 hours until set.
- Slice into bars and serve.
Notes
Tips for Perfect Homemade Kit Kat Bars
1. Use Even Layers
Press wafers gently so layers stay uniform and crisp.
2. Chill Completely
This ensures clean slicing and a firm snap.
3. Temper Chocolate (Optional)
For extra shine and snap, temper your chocolate before coating.
4. Store Properly
Keep bars refrigerated in an airtight container for up to 1 week.
Texture & Flavor Profile
These gluten-free chocolate bars deliver:
- Crisp wafer crunch
- Smooth, creamy chocolate
- Balanced sweetness
- Rich cocoa depth
Each bite has that familiar snap followed by melt-in-your-mouth chocolate goodness.
Fun Variations
Dark Chocolate Version
Replace milk chocolate with all dark chocolate for a richer flavor.
Peanut Butter Twist
Add a thin layer of peanut butter between wafers.
White Chocolate Drizzle
Drizzle melted white chocolate over the top for decoration.
Vegan Option
Use dairy-free chocolate and coconut condensed milk.
Serving Suggestions
These bars are perfect for:
- Holiday treat trays
- Birthday party favors
- Afternoon coffee snacks
- Homemade edible gifts
Serve with cold milk, espresso, or crumble over vanilla ice cream for a decadent dessert topping.
Storage Tips
Store in an airtight container in the refrigerator. For longer storage, freeze for up to 2 months and thaw slightly before serving.
Frequently Asked Questions
Can I freeze these bars?
Yes, they freeze beautifully and maintain texture.
Why are my layers sliding?
Make sure chocolate is slightly thickened before layering.
Can I make them dairy-free?
Absolutely—use coconut oil and dairy-free chocolate alternatives.
Final Thoughts
These Homemade Classic Chocolate Kit Kat Bars – Gluten-Free & Delicious bring nostalgic candy bar joy into your kitchen with simple ingredients and easy steps.
They’re crisp, chocolatey, satisfying, and completely gluten-free—proving you don’t have to compromise on flavor or texture when baking without gluten.
Make a batch once, and you’ll never look at store-bought chocolate bars the same way again.