No Bake Protein Balls: The Ultimate Healthy Snack Recipe
When life gets busy and hunger strikes between meals, having a nutritious grab-and-go snack ready makes all the difference. No bake protein balls are the perfect solution for active individuals, busy parents, fitness enthusiasts, and anyone seeking a healthier alternative to processed snacks. These delicious little energy spheres combine wholesome ingredients into convenient bite-sized portions that deliver sustained energy without requiring any baking or cooking skills. Whether you need a post-workout refuel, an afternoon pick-me-up, or a lunchbox treat for your kids, these protein-packed balls check every box. The best part? You can whip up a batch in under fifteen minutes using simple pantry staples, and they stay fresh in your refrigerator for weeks. This comprehensive guide will walk you through everything you need to know about creating the perfect no bake protein balls, from ingredient selection to storage tips and creative variations.

Why No Bake Protein Balls Are the Perfect Healthy Snack
No bake protein balls have exploded in popularity across health and fitness communities, and for excellent reasons. Unlike many convenient snacks loaded with refined sugars, artificial ingredients, and empty calories, these homemade treats let you control exactly what goes into your body. Traditional granola bars and protein bars often contain long lists of unpronounceable ingredients and hidden sugars that spike your blood glucose levels before causing an energy crash. By making your own protein balls at home, you eliminate preservatives, excessive sweeteners, and unnecessary additives while maximizing nutritional value. Each ball delivers a balanced combination of complex carbohydrates from oats, healthy fats from nuts and seeds, natural sugars from honey or dates, and protein from your choice of nut butters or protein powder. This macronutrient balance provides steady energy release rather than the roller coaster effect of sugary snacks, keeping you satisfied longer and preventing those mid-afternoon slumps. Additionally, no bake protein balls are incredibly budget-friendly compared to store-bought alternatives, costing mere cents per serving when you purchase basic ingredients in bulk. The convenience factor cannot be overstated either – having a container of these ready-to-eat snacks in your refrigerator means healthy eating requires zero additional time or effort during your busiest moments.
Essential Ingredients for Perfect Protein Balls
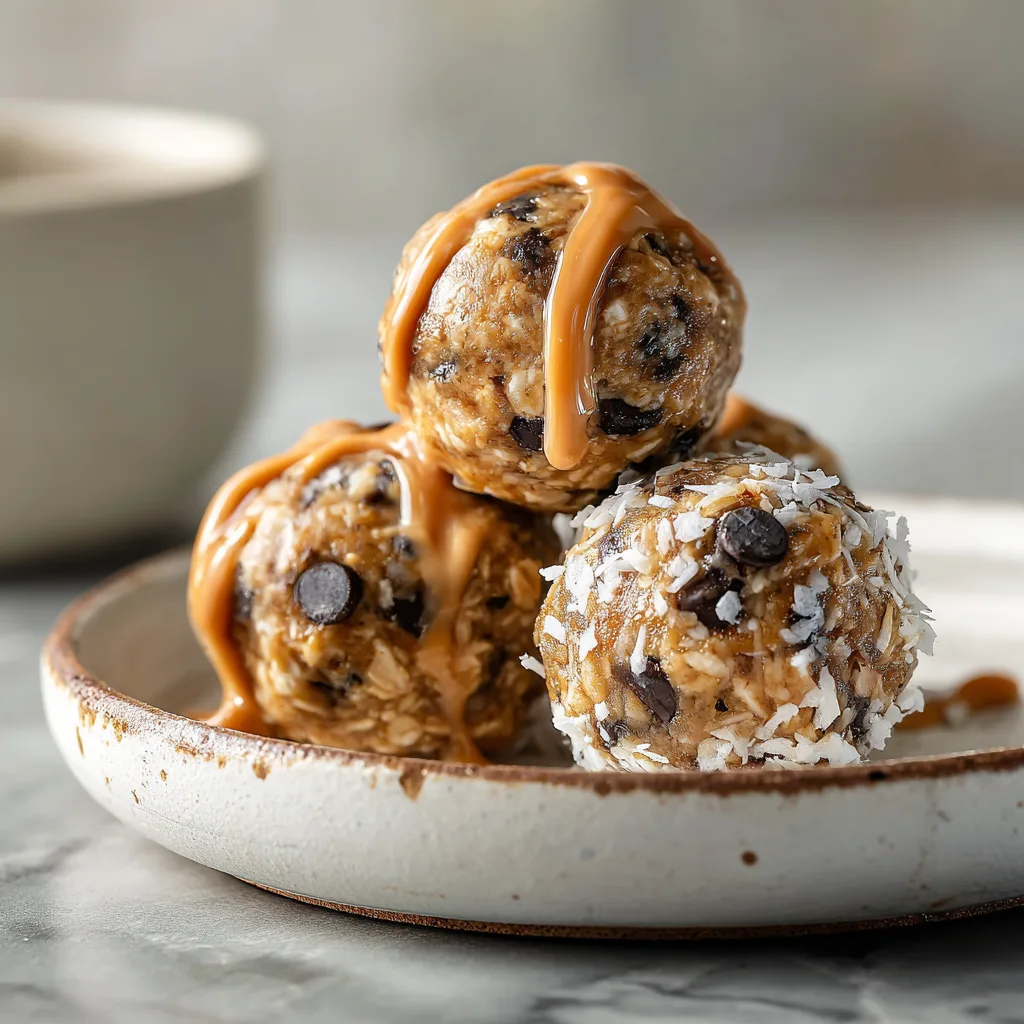
Creating outstanding no bake protein balls requires understanding how each ingredient contributes to texture, flavor, and nutritional profile. The foundation typically consists of rolled oats, which provide fiber, complex carbohydrates, and a pleasantly chewy texture while helping everything bind together naturally. Old-fashioned rolled oats work best because quick oats become too mushy while steel-cut oats remain too firm and separate. Your binding agent – usually peanut butter, almond butter, or another nut butter – serves multiple crucial purposes by holding ingredients together, adding healthy fats and protein, and delivering rich flavor that makes these treats genuinely satisfying. Natural nut butters without added oils or sugars create the cleanest ingredient list, though any variety works fine as long as you account for differences in consistency. Honey or maple syrup provides natural sweetness and additional stickiness to help bind everything, though dates soaked in warm water create a whole-food sweetener alternative if you prefer avoiding liquid sweeteners. Mini chocolate chips add delightful pockets of flavor and make these balls feel more like a treat than health food, helping kids and skeptical adults embrace nutritious snacking. Shredded coconut, chia seeds, flax seeds, vanilla extract, cinnamon, and sea salt represent popular additions that boost nutrition and complexity without complicating the recipe. The beauty of this base formula lies in its flexibility – once you understand the basic ratios, you can customize endlessly based on dietary needs, taste preferences, and whatever ingredients currently occupy your pantry.
Ingredients
- 1 cup rolled oats
- 1/2 cup natural peanut butter
- 1/3 cup honey
- 1/2 cup mini chocolate chips
- 1/4 cup shredded coconut
- 1 teaspoon vanilla extract
- Pinch of sea salt

Instructions
- Combine rolled oats, peanut butter, honey, mini chocolate chips, shredded coconut, vanilla extract, and sea salt in a large mixing bowl, stirring thoroughly until all ingredients are evenly distributed throughout the mixture.
- Using clean hands or a sturdy wooden spoon, mix all ingredients together until the mixture becomes thick, sticky, and homogeneous with no dry pockets of oats remaining in the bowl.
- Cover the bowl with plastic wrap or a clean kitchen towel and refrigerate the mixture for at least 30 minutes to allow it to firm up, making the rolling process significantly easier and less messy.
- After chilling, scoop approximately one tablespoon of mixture at a time and roll between your palms to form smooth balls roughly one inch in diameter, applying gentle but firm pressure to ensure ingredients stick together properly.
- Place completed protein balls on a parchment-lined baking sheet or plate, spacing them slightly apart to prevent sticking during additional chilling time.
- Refrigerate the finished protein balls for at least one hour before serving to allow them to firm up completely and develop the best texture and flavor.
- Store protein balls in an airtight container in the refrigerator for up to two weeks, or freeze them for up to three months for longer-term storage and convenience.
- When ready to eat, consume directly from the refrigerator for a firmer texture, or let them sit at room temperature for 5-10 minutes for a softer, chewier consistency.
No Bake Protein Balls
Ingredients
Equipment
Method
- Combine rolled oats, peanut butter, honey, mini chocolate chips, shredded coconut, vanilla extract, and sea salt in a large mixing bowl, stirring thoroughly until all ingredients are evenly distributed.
- Using clean hands or a sturdy wooden spoon, mix all ingredients together until the mixture becomes thick, sticky, and homogeneous with no dry pockets remaining.
- Cover the bowl with plastic wrap and refrigerate the mixture for at least 30 minutes to allow it to firm up.
- After chilling, scoop approximately one tablespoon of mixture at a time and roll between your palms to form smooth balls roughly one inch in diameter.
- Place completed protein balls on a parchment-lined baking sheet, spacing them slightly apart.
- Refrigerate the finished protein balls for at least one hour before serving to allow them to firm up completely.
- Store protein balls in an airtight container in the refrigerator for up to two weeks, or freeze for up to three months.
- When ready to eat, consume directly from the refrigerator for a firmer texture, or let sit at room temperature for 5-10 minutes for a softer consistency.
Notes
Step-by-Step Instructions for Rolling Success
While making no bake protein balls seems straightforward, a few techniques ensure consistently excellent results every time. Start by measuring all your ingredients accurately, especially the ratio of dry to wet components, since too much moisture creates sticky messes that refuse to hold shape while insufficient binding agents produce crumbly balls that fall apart. Combine your dry ingredients first – oats, chocolate chips, coconut, and any seeds or protein powder – mixing thoroughly to distribute everything evenly before adding wet ingredients. This prevents clumping and ensures every ball contains a balanced mix rather than some being mostly oats while others end up chocolate-heavy. When adding peanut butter and honey, slightly warming them in the microwave for 10-15 seconds makes mixing dramatically easier, especially if your nut butter tends toward thick and stiff. Pour the wet ingredients over the dry mixture and stir vigorously with a sturdy wooden spoon or spatula, really working the mixture until it becomes uniformly sticky with no dry oat pockets remaining. The mixture should feel tacky and stick to your fingers slightly when pressed, but shouldn’t be so wet that it oozes or feels soupy. Chilling before rolling is absolutely essential – this step allows the mixture to firm up substantially, making the rolling process infinitely easier and producing balls that actually hold their round shape. When you’re ready to roll, keep a small bowl of water nearby to dampen your palms occasionally, preventing excessive sticking while maintaining enough tackiness for ingredients to adhere. Scoop consistent amounts using a cookie scoop or tablespoon, then roll quickly between your palms with medium pressure – too gentle and balls won’t compress properly, too firm and you’ll squeeze out all the binding ingredients.
Creative Variations to Keep Things Interesting
Once you’ve mastered the basic no bake protein ball formula, an entire world of flavor combinations and nutritional modifications opens up for exploration. For chocolate lovers, replace regular chocolate chips with dark chocolate chips or cacao nibs, add two tablespoons of cocoa powder to the dry ingredients, or stir in a tablespoon of chocolate protein powder for extra protein and intense chocolate flavor. Creating almond joy-inspired balls requires using almond butter instead of peanut butter, increasing the coconut to half a cup, and adding slivered almonds plus extra dark chocolate chips for that classic candy bar taste. Breakfast cookie balls work wonderfully by mixing in dried cranberries or chopped dates, a teaspoon of cinnamon, and replacing some oats with crispy rice cereal for added crunch and morning appeal. Monster cookie protein balls incorporate M&Ms or colorful candy-coated chocolates instead of regular chocolate chips, making them irresistible to children while sneaking in nutritious ingredients. For those following specific dietary patterns, these balls adapt beautifully – swap honey for maple syrup or date paste for vegan versions, use certified gluten-free oats for celiac-safe snacks, or replace nut butters with sunflower seed butter for nut-free alternatives suitable for school lunches. Pumpkin spice balls become autumn favorites by adding pumpkin puree, pumpkin pie spice, and pepitas, while lemon coconut balls brighten things up with lemon zest, extra coconut, and white chocolate chips. The possibilities truly are endless, limited only by your imagination and willingness to experiment with different flavor combinations and nutritious add-ins.
Storage Tips and Meal Prep Strategies
Proper storage ensures your no bake protein balls maintain optimal texture, flavor, and freshness throughout their shelf life while preventing common problems like excessive hardening or sticking together. Always store protein balls in airtight containers to prevent them from drying out or absorbing refrigerator odors from other foods, which can significantly impact their taste. Glass containers with tight-fitting lids work exceptionally well, though quality plastic storage containers or resealable silicone bags function perfectly too. Layer protein balls in single layers separated by parchment paper if stacking becomes necessary, preventing them from sticking together and making individual removal easier when grabbing a quick snack. Refrigerator storage keeps protein balls fresh for approximately two weeks, though they rarely last that long in most households before getting devoured. For longer-term storage, freezing works beautifully – arrange balls on a parchment-lined baking sheet and freeze until solid before transferring to freezer bags or containers, preventing them from freezing into one solid clump. Frozen protein balls keep for up to three months and thaw quickly at room temperature, making them perfect for meal prep enthusiasts who prefer making large batches infrequently. Many people actually prefer eating these frozen or partially frozen, especially during summer months when they provide a refreshing cold treat similar to ice cream bites. When packing protein balls for lunch boxes, use small reusable containers or silicone muffin cups to prevent crushing and keep them separate from other foods. Including a small ice pack maintains proper temperature during transit, though these balls tolerate room temperature for several hours without safety concerns.
Nutritional Benefits and Dietary Considerations
Understanding the nutritional profile of no bake protein balls helps you appreciate why they represent such a superior snacking choice compared to ultra-processed alternatives. Each ball typically contains between 80-120 calories depending on size and specific ingredients, providing substantial energy in a compact package without excessive caloric density. The combination of rolled oats and nut butter delivers approximately 3-5 grams of protein per ball, supporting muscle recovery, promoting satiety, and helping stabilize blood sugar levels throughout the day. Healthy fats from nut butters and optional seeds provide essential fatty acids that support brain function, hormone production, and nutrient absorption while contributing to that satisfying, lasting fullness that keeps you from reaching for more snacks shortly afterward. The fiber content from oats and any added seeds promotes digestive health, further enhances satiety, and contributes to steady energy release rather than rapid spikes and crashes. While these balls do contain natural sugars from honey and chocolate chips, the amounts remain modest and are buffered by protein, fat, and fiber that slow sugar absorption into your bloodstream. For those tracking macronutrients, protein balls offer an excellent balanced snack that doesn’t skew too heavily toward any single macro, making them suitable for various dietary approaches from general healthy eating to specific athletic nutrition plans. Parents appreciate that these provide genuinely nutritious fuel for growing children without relying on artificial ingredients, excessive sugars, or empty calories found in most kid-targeted snacks.
Conclusion: Your New Favorite Healthy Snack Awaits
No bake protein balls deserve a permanent place in your healthy eating rotation thanks to their unbeatable combination of nutrition, convenience, versatility, and delicious taste. These little powerhouses prove that healthy snacking doesn’t require complicated recipes, expensive specialty ingredients, or significant time investments – just fifteen minutes and basic pantry staples stand between you and a two-week supply of grab-and-go nutrition. Whether you’re fueling workouts, satisfying afternoon hunger, packing school lunches, or simply trying to make better snacking choices, protein balls deliver consistently excellent results that please both your taste buds and your body. The endless customization possibilities ensure you’ll never get bored, allowing you to rotate through different flavor combinations while accommodating dietary restrictions and personal preferences effortlessly. Start with the classic recipe provided here to master the basic technique, then let your creativity run wild exploring variations that excite you most. Once you experience how easy, affordable, and satisfying homemade protein balls can be, you’ll wonder why you ever purchased expensive protein bars or relied on less nutritious convenience snacks. Mix up a batch this weekend and discover why millions of health-conscious people consider no bake protein balls an absolute essential in their weekly meal prep routine.